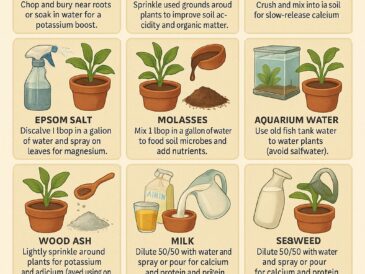
- Use a balanced fertilizer (e.g., 10-10-10) during early growth stages to support leaf and root development.
- Switch to a bloom booster (low nitrogen, higher phosphorus and potassium) once flower buds form. Look for formulations like 5-10-10.
- Apply fertilizer monthly or every 6 weeks, depending on soil richness.
- Avoid overfeeding with nitrogen, which can lead to lush foliage at the expense of flower production.
Amending the soil yearly with compost also ensures a slow-release source of nutrients.
7. Stake for Support
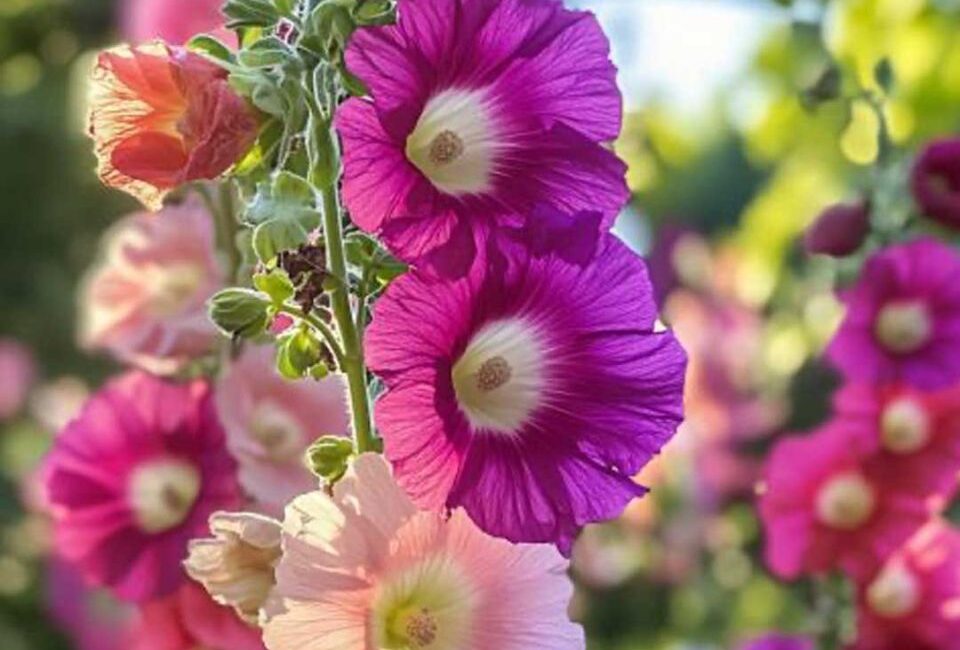
Because hollyhocks can grow 6 to 9 feet tall, they often require staking to prevent flopping or snapping.
- Use bamboo stakes, wooden dowels, or metal rods for vertical support.
- Tie stems loosely with soft twine or plant ties at several intervals.
- Install supports early while plants are still manageable to avoid damaging roots later.
Alternatively, plant hollyhocks along fences or trellises to provide natural support without extra materials.
8. Prune and Deadhead Strategically
Pruning and deadheading encourage more prolific blooms and healthier plants.
- Deadhead spent blooms by cutting back the flower stalk just above a healthy leaf node. This redirects energy into more blooms rather than seed production.
- Cut the whole stalk back after flowering to encourage second flushes in some varieties or to clean up biennials.
- In late summer, remove diseased or yellowing leaves promptly to improve air circulation and reduce disease spread.
At the end of the season, consider cutting the plant back to ground level after the first frost.
9. Prevent and Manage Rust
Rust (Puccinia malvacearum) is a common fungal disease affecting hollyhocks. It appears as orange, brown, or yellow pustules on the underside of leaves and can severely impact flower production.
Prevention tips:
- Space plants properly to ensure good air flow.
- Avoid wetting the leaves during watering.
- Choose rust-resistant varieties, such as ‘Happy Lights’ or ‘Summer Carnival’.
- Mulch to prevent soil-borne spores from splashing onto foliage.
Treatment:
- Remove infected leaves and dispose of them (do not compost).
- Use organic fungicides like neem oil or sulfur sprays.
- Rotate planting locations every 2–3 years to reduce rust spores in the soil.
10. Encourage Self-Seeding or Replanting
While biennial hollyhocks usually die after blooming, they can self-seed prolifically, allowing you to enjoy new plants year after year.
- Let a few flower stalks go to seed. When the seed pods dry and turn brown, collect and store them in a cool, dry place.
- Scatter seeds in autumn or early spring in prepared beds.
- Alternatively, start fresh seedlings indoors and transplant them where needed.
Regular replanting or self-seeding ensures continuous displays and allows you to experiment with different colors and varieties.
11. Companion Planting and Garden Design
Hollyhocks are not just functional—they’re also a visual centerpiece. Integrating them properly into your garden design can enhance their effect.
- Companion plants: Pair with delphiniums, foxgloves, echinacea, daisies, or lavender for a cottage garden effect.
- Color themes: Use a mix of pink, white, red, and purple hollyhocks, or stick to a single-color palette for dramatic impact.
- Layering: Plant hollyhocks behind lower-growing perennials or shrubs to hide bare stems while showcasing the flowers.
They also serve as vertical elements in garden beds, framing entrances or anchoring borders.
12. Overwintering and Long-Term Maintenance
In colder climates, hollyhocks may need protection to survive harsh winters, especially when grown as short-lived perennials.
- Mulch heavily in late autumn with straw or leaf mold to insulate roots.
- In very cold zones, cover crowns with a frost blanket or protective cloche.
- For container-grown hollyhocks, move them to a sheltered area like a cold frame or unheated greenhouse.
Each spring, remove mulch and inspect crowns for rot or winter damage, dividing any overly congested clumps if necessary.
Conclusion: A Year-Round Commitment to Glorious Blooms
Growing hollyhocks isn’t a set-it-and-forget-it affair—it’s a year-round commitment to nurturing their tall, stately spikes into glorious, flower-laden towers. With thoughtful variety selection, ideal site placement, well-prepared soil, and attentive care, these flowers can grace your garden with spectacular blooms season after season.
From the moment seeds are sown to the final frost, each phase offers an opportunity to help your hollyhocks flourish. Employing these 12 tips not only ensures vibrant blooms but also fosters a deeper connection with one of gardening’s most iconic floral stars.