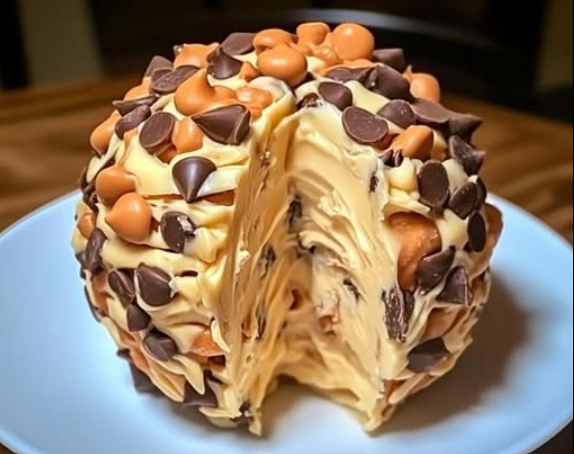
When you think of the perfect dessert to serve at a party, what comes to mind? For many, it’s something that combines indulgence, flavor, and a dash of fun. Well, if you’re looking to wow your guests with a treat that ticks all those boxes (and more!), look no further than the Reese’s Cheese Ball! This dessert takes your classic cheese ball and gives it a sweet, creamy twist that’ll have everyone reaching for seconds.
Not only is this Reese’s Cheese Ball the perfect blend of peanut butter and chocolate, but it’s also incredibly easy to make! It’s the ultimate dessert-meets-party-snack recipe that combines the creamy richness of cream cheese, the sweetness of peanut butter, and the irresistible crunch of candy. It’s a showstopper that can be made ahead of time and is ideal for any event, from casual get-togethers to more formal parties. Let’s dive into how to create this peanut butter bliss dessert.
Ingredients 🛒:
Before we get into the step-by-step guide, let’s take a quick look at the ingredients you’ll need to whip up this decadent Reese’s Cheese Ball:
For the Cheese Ball:
- 8 oz cream cheese, softened: The base of this dessert, cream cheese adds the perfect creamy texture that pairs wonderfully with peanut butter.
- 1/2 cup peanut butter: The star ingredient! Choose a smooth or crunchy peanut butter, depending on your preference.
- 1/2 cup powdered sugar: For that perfect balance of sweetness without being overpowering.
For Rolling:
- 1 cup mini chocolate chips: These will add a burst of rich, chocolaty goodness to the outside of the cheese ball, making it even more irresistible.
- 1/2 cup crushed Reese’s Peanut Butter Cups (or Reese’s Pieces): These crushed candy pieces will bring that unmistakable Reese’s flavor and a delightful texture.
- 1/4 cup chopped peanuts (optional): If you want to add some extra crunch and nutty flavor, chopped peanuts are a great addition.
Tools You’ll Need:
To make this Reese’s Cheese Ball recipe a success, here are some tools you will need to have on hand:
- Mixing bowl: A large mixing bowl will be crucial for combining the cream cheese, peanut butter, and powdered sugar.
- Hand mixer or stand mixer: While you can mix by hand, using a hand mixer or stand mixer makes the process quicker and helps achieve a smooth, lump-free mixture.
- Plastic wrap or wax paper: To help shape the cheese ball and wrap it before refrigerating.
- Serving platter or plate: For presenting the cheese ball once it’s ready to serve.
- Spatula: For scraping down the sides of the bowl and shaping the cheese ball.
Step-by-Step Instructions: How to Make Reese’s Cheese Ball
Step 1: Prepare the Cream Cheese Mixture
Start by softening the cream cheese so that it’s easy to mix and combines smoothly with the peanut butter. If you forgot to take the cream cheese out of the fridge ahead of time, no worries! You can quickly soften it in the microwave by unwrapping it and microwaving it for about 10-15 seconds.
Once your cream cheese is softened, place it in a large mixing bowl. Add the peanut butter and powdered sugar to the bowl.
Using your hand mixer or stand mixer, mix the ingredients on low speed until everything starts to combine, then increase the speed to medium and beat the mixture until it becomes smooth and creamy. You’ll want to make sure that the powdered sugar is fully incorporated and there are no lumps in the mixture.
At this point, the texture should be smooth, slightly fluffy, and easy to shape. This is the base of your Reese’s Cheese Ball!
Step 2: Chill the Mixture
After mixing, you’ll want to chill the mixture before rolling it into a ball. This helps it firm up, making it easier to shape and preventing the mixture from being too sticky to work with.
- Cover the bowl with plastic wrap or transfer the mixture to a parchment paper-lined surface. Allow it to chill in the fridge for at least 30 minutes. If you’re preparing this dessert ahead of time, you can leave it in the fridge for several hours or even overnight.
Step 3: Shape the Cheese Ball
Once the mixture has chilled and firmed up a bit, it’s time to roll it into a ball. Simply scoop out the chilled mixture with a spoon or spatula and use your hands to roll it into a ball shape. You can make the ball as big or as small as you like, but typically a medium-sized ball (about the size of a grapefruit) works best.
- Tip: If the mixture feels too sticky, wet your hands slightly before shaping the ball. This will help prevent the mixture from sticking to your fingers.
Step 4: Roll the Cheese Ball in the Toppings
Now comes the fun part—rolling the cheese ball in the toppings to add that delicious crunch and extra flavor!
- Place the mini chocolate chips, crushed Reese’s Peanut Butter Cups, and chopped peanuts (if using) on a large plate or shallow bowl.
- Gently roll the cheese ball in the chocolate chips, crushed candy, and peanuts until it’s fully coated. The goal is to get an even layer of toppings all around the cheese ball, ensuring that every bite will be as flavorful as the last.
- Tip: Press gently as you roll the cheese ball in the toppings to ensure the candy and chocolate pieces stick well to the surface.
Step 5: Chill Again
Once your cheese ball is coated and looking absolutely delicious, it’s time to chill it again for about 30 minutes. This second chilling period ensures that the toppings stay intact, and it helps the cheese ball firm up before serving.
Step 6: Serve and Enjoy!
After the final chilling session, it’s time to serve your Reese’s Cheese Ball! Remove it from the fridge, place it on a serving platter, and provide an assortment of items for your guests to dip into it.
- What to Serve with Your Reese’s Cheese Ball:
- Graham crackers: These are the perfect crunchy dipper for this sweet, creamy treat.
- Pretzels: The salty-sweet combo of pretzels and peanut butter is irresistible.
- Fruit: Apple slices or bananas provide a refreshing contrast to the rich peanut butter flavor.
- Marshmallows: For an extra indulgent touch, try dipping marshmallows into the cheese ball.
This Reese’s Cheese Ball will be a hit at any event! It’s ideal for birthday parties, holiday gatherings, potlucks, or just a fun treat to serve for movie night.
Tips for Making the Perfect Reese’s Cheese Ball:
- Adjust the Sweetness: If you prefer your dessert a little less sweet, reduce the amount of powdered sugar slightly. You can always taste the mixture as you go and adjust to your liking.
- Make Ahead: This cheese ball can be made up to a day in advance. In fact, letting it chill overnight helps the flavors meld together even better.
- Peanut Butter: Feel free to use any type of peanut butter you like—smooth or crunchy! Crunchy peanut butter will add an extra layer of texture to your cheese ball.
- Decorating: If you want to make the cheese ball extra festive, consider decorating it with some additional mini Reese’s Peanut Butter Cups on top or even a drizzle of melted chocolate.
Why You’ll Love This Reese’s Cheese Ball:
This dessert is the perfect balance of creamy, sweet, salty, and chocolatey. It’s versatile, as you can serve it with various dippers, and it’s a great conversation starter at parties. The texture is smooth and fluffy, yet the crushed Reese’s Peanut Butter Cups and chocolate chips add an irresistible crunch. Every bite is pure peanut butter bliss, with the added excitement of the candy coating on the outside.
Whether you’re a peanut butter lover or just a fan of fun, indulgent desserts, this Reese’s Cheese Ball will quickly become a favorite. It’s a dessert that combines the best of both worlds—easy to make and absolutely delicious!
Conclusion: A Showstopper Dessert!
The Reese’s Cheese Ball is a dessert that is as delightful to make as it is to eat. With its creamy peanut butter center, rich chocolate coating, and crunchy candy exterior, it’s a treat that your guests will crave. Whether you’re preparing it for a casual get-together or a special event, this dessert will definitely steal the spotlight. It’s simple, yet decadent, and bound to satisfy any sweet tooth. So next time you’re in need of a crowd-pleasing dessert, give this Reese’s Cheese Ball a try—you won’t regret it!