Introduction: Why June Is the Best Time to Propagate Plants
Gardening is more than a hobby—it’s a rewarding lifestyle that connects us to nature while beautifying our surroundings. Among the many gardening techniques, propagation by cuttings stands out as a cost-effective and reliable way to multiply your plants. Instead of buying new plants, you can produce multiple new plants from just one mother plant, preserving the exact traits you love.
June is widely considered the ideal month to propagate many plants. This is because the environmental conditions are near perfect: temperatures are warm but not scorching, daylight hours are long, and plants are in their peak growth phase. These factors create an optimal environment for cuttings to root quickly and develop into healthy, vigorous plants.
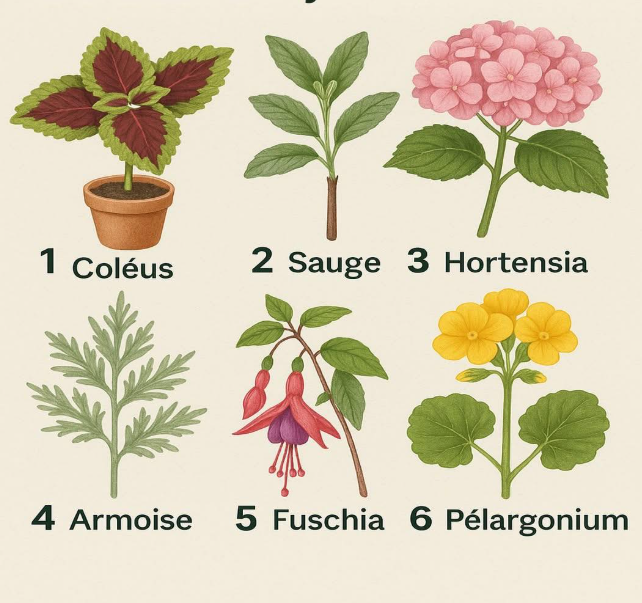
This article dives deep into six flowers that are especially easy and rewarding to propagate in June. For each, you’ll find a detailed profile, propagation steps, expert tips for success, and post-propagation care advice to ensure your new plants thrive.
1. Coleus: Vibrant, Easy-to-Root Foliage for Instant Color
Plant Overview
Coleus is renowned for its spectacularly colorful foliage. With leaves in stunning shades of red, pink, purple, yellow, green, and multicolored patterns, coleus brightens up gardens, patios, and indoor spaces alike. Originally a tropical plant, coleus thrives in summer conditions and is appreciated for its simple care.
Why Propagate Coleus?
- Roots easily in water, making it an excellent choice for beginners.
- Guarantees exact color and leaf pattern clones of the parent plant.
- Enables you to produce many plants at zero cost, ideal for sharing or expanding your garden.
Step-by-Step Propagation Instructions
- Select a healthy cutting: Choose a non-flowering stem about 8 to 10 cm long. Cut just below a leaf node (where leaves join the stem).
- Prepare the cutting: Remove the lower leaves, leaving 2–3 at the top to reduce water loss.
- Place in water: Set the cutting in a glass or jar filled with clean, room-temperature water. Avoid direct sunlight but keep in a bright spot.
- Change the water frequently: Refresh every 2–3 days to prevent bacterial growth that causes rot.
- Watch for roots: Within 1–2 weeks, small white roots should appear. Once roots reach 2–3 cm, plant the cutting into well-draining soil mixed with sand or perlite.
- Acclimate the new plant: Keep initially in partial shade and gradually expose to more light.
Care Tips for Vibrant Coleus
- Regular pinching encourages bushier growth and fuller foliage.
- Water moderately; avoid soggy soil to prevent root rot.
- Use nitrogen-rich fertilizer for lush leaf development.
2. Sage: Aromatic and Useful Herb That Roots Quickly
Plant Profile
Sage (Salvia officinalis) is a versatile perennial herb prized for its culinary and medicinal uses. Its grey-green leaves emit a pleasant aroma that also acts as a natural insect deterrent, making it a great companion plant in vegetable gardens.
Benefits of Propagating Sage
- Produces vigorous new plants rapidly.
- Maintains aromatic and medicinal properties true to the original plant.
- Expands your herb garden easily without buying new plants.
How to Propagate Sage Cuttings
- Choose a semi-woody stem about 10 cm long, one that has begun to harden but remains flexible.
- Strip leaves from the bottom half to reduce evaporation.
- Optional rooting hormone: Dip the base in rooting powder to encourage root development.
- Plant in a light, well-draining mix of sandy soil and potting mix.
- Cover the cutting with a plastic bag or place in a mini greenhouse to maintain humidity.
- Place in bright, indirect light away from direct sun.
- Keep soil moist but not wet.
- Roots typically form in 3-4 weeks, after which you can transplant to larger pots or garden beds.
Aftercare
- Gradually introduce your sage plants to full sun.
- Avoid overwatering to prevent fungal diseases.
- Prune after flowering to encourage fresh growth.
3. Hydrangea: A Garden Classic Made Easy to Multiply
Introduction
Hydrangeas are beloved for their large, showy flower heads in colors ranging from white to pink, blue, and purple. They add volume and softness to borders and containers and are a staple in many gardens.
Why Propagate Hydrangea?
- Propagation ensures you retain the exact flower color and form.
- It’s easier than growing from seed, which may not be true to the parent.
- Produces mature plants in a shorter timeframe.
Detailed Propagation Method
- Select a healthy, non-flowering stem with 3-4 leaf nodes.
- Cut a 10–15 cm section, just below a node.
- Remove the bottom leaves, leaving 2 leaves at the top.
- Plant the cutting in a mix of peat moss and sand for optimal moisture retention and drainage.
- Cover with plastic or place in a humidity dome to keep the cutting moist.
- Place in bright, indirect light in a cool spot.
- Maintain moist but not soggy soil.
- Roots should develop within 4-6 weeks. Transplant to bigger pots or outdoors after rooting.
Post-Propagation Care
Click page 2 for more