- Wash and dry the plastic bottle thoroughly.
- Remove the label to ensure sunlight penetrates to the soil.
- Using scissors or a craft knife, carefully cut off the bottom 2 to 3 inches of the bottle.
- Near the cut edge, poke two small holes opposite each other to thread the string or wire through for hanging.
- Remove the bottle cap and insert a small piece of sponge, cloth, or coconut coir into the neck to prevent soil from escaping while allowing water drainage.
Step 2: Preparing the Soil Mix
Tomatoes are heavy feeders and require nutrient-rich, well-draining soil. Use the following potting mix blend:
- 40% garden soil or rich compost
- 30% cocopeat or peat moss (for moisture retention)
- 20% vermicompost or aged manure (for nutrients)
- 10% sand or perlite (for aeration and drainage)
This combination prevents waterlogging and promotes healthy root development.
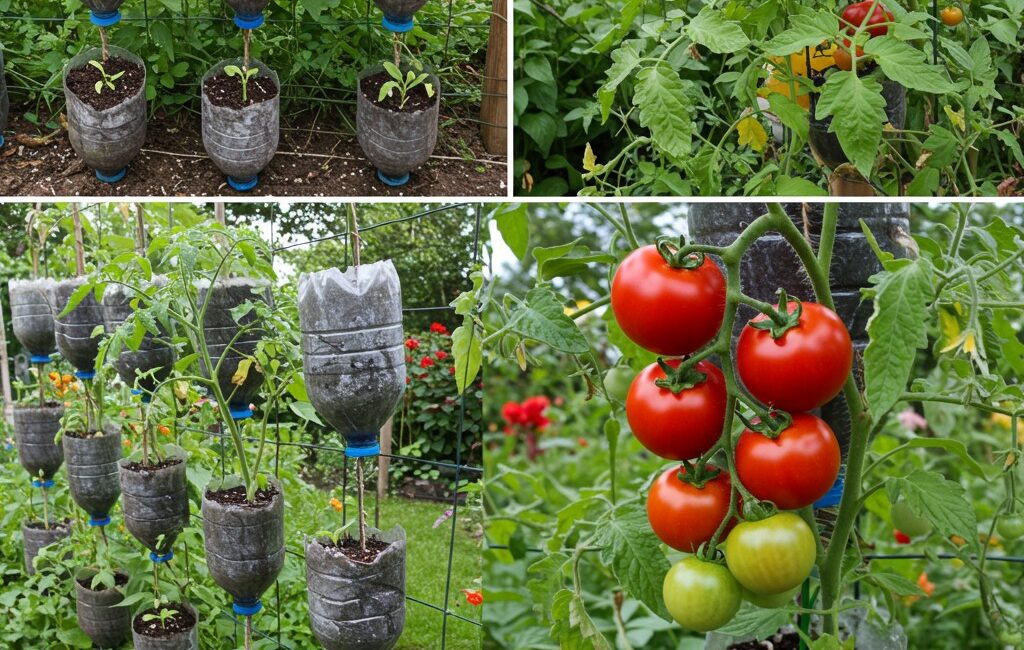
Step 3: Transplanting the Tomato Seedlings
- Choose healthy, young tomato seedlings with flexible stems.
- Gently pass the root ball through the open bottom of the bottle (now the top), allowing the leafy part to extend out of the bottle neck.
- Hold the roots carefully and slowly fill the bottle with the prepared potting mix, pressing lightly to eliminate air pockets.
- Make sure the plant is stable and upright inside the bottle neck.
Step 4: Hanging Your Tomato Planters
- Thread sturdy string, twine, or wire through the holes near the bottle opening.
- Secure the knots tightly.
- Hang the bottles in a location that receives at least 6–8 hours of direct sunlight daily.
- Popular spots include balcony railings, fences, walls, window grills, or porch ceilings.
Step 5: Watering and Nutrient Management
- Water the plant regularly through the bottle opening using a small watering can or spray bottle.
- Check moisture daily; hanging bottles dry out faster than ground containers.
- Avoid waterlogging by ensuring excess water drains out.
- Apply organic fertilizers weekly, such as compost tea or diluted banana peel liquid, to promote flowering and fruit set.
- Mulch the soil surface with dried leaves or coconut husks to retain moisture.
Step 6: Pruning and Support
- Remove yellowing or dead leaves to maintain airflow and plant health.
- Pinch off side shoots or suckers that divert energy from fruit production.
- If necessary, loosely tie small supports around fruit clusters to protect them from wind damage.
Tips for Success and Troubleshooting Common Issues
Preventing Overwatering and Root Rot
- Use a potting mix that drains well.
- Water only when the top inch of soil feels dry.
- Ensure the sponge or cloth in the bottle neck allows excess water to drain.
Combating Pests Naturally
- Use neem oil spray or insecticidal soap for aphids and whiteflies.
- Introduce beneficial insects such as ladybugs if possible.
- Avoid chemical pesticides to keep your tomatoes organic and safe.
Encouraging Pollination
- Since hanging tomatoes are indoors or on balconies, gently shake the plants or use a soft brush to transfer pollen between flowers.
- Alternatively, place the bottles near an open window to attract pollinators.
Dealing with Insufficient Sunlight
- Move the planters to sunnier spots if leaves become pale or plants grow leggy.
- Supplement with grow lights during winter or low-light periods.
Advantages Over Traditional Gardening
Growing tomatoes in hanging plastic bottles offers unmatched benefits:
- No Soil Preparation or Weeding: No digging, turning, or weeding required.
- Pest and Disease Resistance: Elevated position and controlled environment reduce common problems.
- Year-Round Gardening Potential: With grow lights, you can extend growing seasons.
- Cost-Effective: Uses recycled materials and minimal equipment.
- Ideal for Mobility: Perfect for renters or those who relocate often.
- Educational: Teaches sustainability and urban farming skills.
Environmental Impact and Sustainability
By repurposing plastic bottles, you contribute to reducing plastic pollution. Globally, millions of plastic bottles are discarded daily, often ending up in landfills or oceans. Using these bottles as planters extends their life cycle and diverts waste from harmful disposal.
This DIY project encourages eco-conscious living, reduces reliance on store-bought produce with carbon footprints, and promotes homegrown food security.
Advanced Variations and Enhancements
- Multi-tier Hanging Gardens: String several bottles vertically to create cascading tomato walls.
- Automatic Drip Irrigation: Incorporate small drip lines for consistent watering.
- Companion Planting: Grow basil or marigolds in adjacent bottles to deter pests and improve flavor.
- Hydroponic Adaptation: Modify bottles with net pots for soil-less tomato cultivation.
- Solar-Powered Grow Lights: Integrate renewable energy to boost growth in shaded areas.
Final Thoughts
Growing tomatoes hanging in plastic bottles offers a brilliant, innovative solution for those who lack traditional garden space. This method brings fresh, nutritious tomatoes within reach of urban gardeners and sustainability advocates alike. With minimal investment, simple materials, and a bit of care, you can enjoy the sweetness of homegrown tomatoes year-round—no garden required.
Not only does this practice support eco-friendly living by recycling plastic, but it also cultivates a rewarding hobby that brings you closer to nature. Start your vertical tomato garden today and experience the joy of harvesting fresh fruits grown right from your wall or window.
If you want, I can provide detailed care schedules, printable garden journals, or step-by-step video tutorials next to further support your urban gardening journey. Just let me know!
Keywords and phrases integrated for maximum reach:
urban gardening, vertical gardening, container gardening, hanging planters, plastic bottle gardening, sustainable gardening, dwarf tomato varieties, cherry tomatoes, space-saving gardening, DIY planter, eco-friendly garden ideas, no garden gardening, balcony gardening, how to grow tomatoes indoors, compost tea fertilizer, organic tomato care, pest control natural, tomato pruning tips.