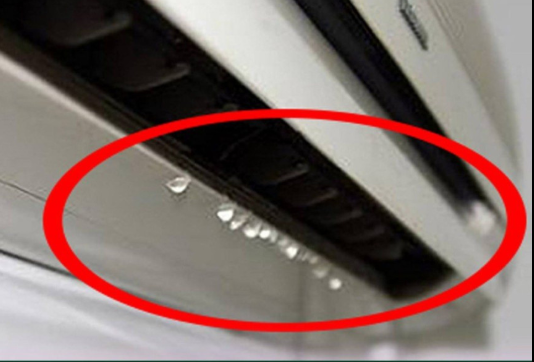
Nothing disrupts a cool, comfortable home like an unexpected puddle of water under your air conditioner. You hear the familiar hum of your AC running, but then you spot it — a slow drip, a steady leak, or even a minor flood. For most homeowners, the first instinct is to call an air conditioning repair technician. But in many cases, you can solve the problem yourself with a little time, patience, and basic knowledge.
This guide walks you through everything you need to know and do when your air conditioner starts leaking water — including step-by-step fixes, prevention tips, and how to know when it’s time to call in the pros. If you want to avoid high AC service costs and take control of your home’s comfort, read every word of this comprehensive breakdown.
Why Is My Air Conditioner Leaking Water?
To fix the leak, you first need to understand why it’s happening. Water around your indoor AC unit doesn’t necessarily mean something is broken. In fact, your system is supposed to produce water — just not spill it.
The Cooling Process Explained
Your AC works by pulling warm air from your home, cooling it down, and pushing it back into your living space. During this process, warm air passes over cold evaporator coils, causing humidity in the air to condense into liquid water. That moisture collects in a drain pan and exits through a condensate drain line.
When this system is functioning properly, the water is quietly removed without you ever seeing it. But when one small part of this process goes wrong, the water ends up leaking onto your floor, ceiling, or walls.
Common Reasons for AC Water Leaks
Here are the most likely causes behind your leaking air conditioner:
- Clogged condensate drain line
- Cracked or rusted drain pan
- Dirty air filter causing coil freezing
- Frozen evaporator coils melting too fast
- Improper installation or tilting
- Low refrigerant levels
- Faulty or overfilled condensate pump
- Mold, dirt, or algae buildup inside drain system
Any of these problems can cause your unit to leak — but the good news is that many of them are easy to fix without professional help.
Stop the Leak Now: A Step-by-Step DIY Approach
Before spending money on emergency AC repair or expensive HVAC maintenance contracts, try these proven steps to solve the issue yourself. You’ll save money, protect your home, and gain confidence handling basic home energy efficiency improvements.
✅ Step 1: Turn Off the Power
Safety first. Never inspect or work on your air conditioning system while it’s running.
- Switch off your AC from the thermostat.
- Shut off the power to the system at the breaker box.
This prevents electrical shock, damage to your system, or injury if water is near wiring or motors.
✅ Step 2: Check the Air Filter
A dirty or clogged air filter can severely restrict airflow across the evaporator coil. This often causes the coil to get too cold and freeze. When the ice melts, it releases more water than the system can handle, resulting in overflow and leakage.
What to do:
- Remove the air filter from its housing.
- Hold it up to light. If you can’t see through it, it’s too dirty.
- Replace with a new filter if disposable. If reusable, wash it gently and allow to fully dry.
- Reinstall and note the date for future filter changes.
🛠️ Pro Tip: Change your air filter every 30–90 days depending on usage, pets, and indoor air quality.
✅ Step 3: Inspect the Drain Pan
The drain pan sits under your evaporator coil and catches water that drips off. If it’s cracked, rusted, or not positioned correctly, water will escape.
Check for:
- Standing water in the pan
- Rust spots or visible holes
- Cracks, especially near the corners
- Overflow due to clogged exit hole
If the pan is damaged:
- Use waterproof epoxy to patch small cracks.
- Replace the pan if corrosion is severe or holes are large.
🛠️ Pro Tip: Temporarily place a baking tray or shallow pan under the unit to catch leaks while making repairs.
✅ Step 4: Clear the Condensate Drain Line
The #1 cause of AC water leaks is a clogged drain line. Over time, mold, algae, dust, and debris build up in the PVC pipe, blocking the flow of water.
How to clear it:
- Locate the drain line access (a T-shaped vent with a cap).
- Remove the cap and check inside with a flashlight.
- Use a wet/dry vacuum to suck out clogs from the outside end of the line (usually near the condenser).
- Pour a cup of distilled white vinegar into the access to kill algae.
- Let it sit for 30 minutes, then flush with clean water.
🛠️ Pro Tip: Repeat this process monthly to prevent future clogs.
✅ Step 5: Inspect the Evaporator Coil for Ice
If you find ice on the coil or refrigerant lines, your system is overcooling and freezing up.
Causes:
- Low refrigerant levels
- Poor airflow (dirty filter, blocked vents)
- Faulty thermostat or fan
What to do:
- Turn the system off completely.
- Let the ice melt naturally (can take hours).
- Place towels or a bucket under the unit to catch water.
- Check airflow and filters again before restarting.
🛠️ Pro Tip: Don’t chip off the ice — it can damage the coil fins.
✅ Step 6: Check for Condensate Pump Issues
Click page 2 for more