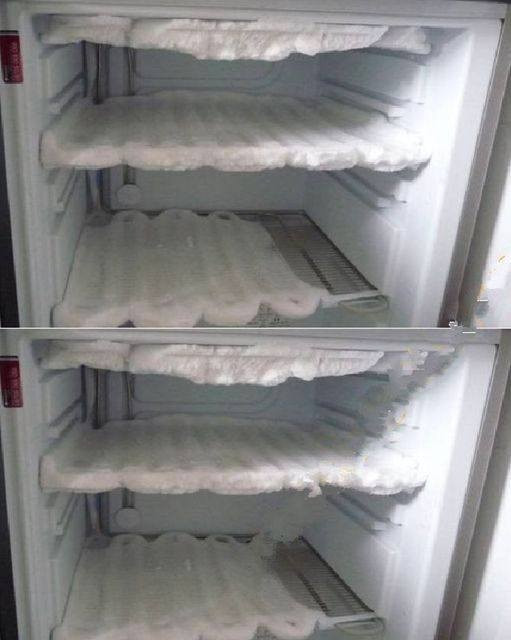
Before revealing the trick, it helps to understand why ice forms in freezers—and why it matters.
The Causes of Frost & Ice Build‑Up
- Moisture infiltration
Every time you open the freezer, warm moist air enters. That air condenses onto cold surfaces or coils and freezes, forming frost. Over many cycles, that frost accumulates. - Seals and gaskets failing
If the door seal is not tight (cracked, warped, dirty), ambient air can seep in continuously, adding moisture load. - Overstuffing or blocking vents
Poor air circulation forces humidity to deposit on surfaces rather than being removed. - Frequent door openings
The more often you open the door, the more warm air enters, accelerating frost formation. - Leaks or cracks
Gaps, cracks, or poor insulation allow outdoor air intrusion.
Why You Need to Defrost (Don’t Delay)
- Efficiency loss / increased power draw: More ice means poorer thermal transfer, so the compressor works harder.
- Reduced usable space: The ice layer eats into your storage volume.
- Cooling performance degrades: Food may not freeze as well, may thaw slightly, or suffer freezer burn.
- Potential damage / strain: Heavier ice stresses interior parts, door hinges, walls, and can lead to failure or leaks.
- Contamination risk: Water from melting ice can leak, drip, or pool—leading to mold, odors, or damage to flooring.
So periodic defrosting is essential—not optional.
But the traditional method (turn off, wait hours, melt, reconnect) is slow and messy. What follows is how to speed it up dramatically, safely, and with minimal effort.
The Fast, Low‑Effort Defrost “Trick” (What You Want to Know)
Here’s the core method: Using hot vapor — from a pot of near‑boiling water or an electric kettle — inside the freezer in a closed environment to soften and melt ice rapidly. Combined with strategic positioning, drainage, and heat transfer, you can defrost substantial frost layers in minutes, not hours.
Below is the step‑by-step protocol, then I’ll break down the science, materials, precautions, and enhancements.
Step‑by‑Step: Rapid Defrost Method
What You’ll Need
- A kettle or pot capable of boiling water
- Hot water (as close to boiling as possible)
- A shallow metal pan or tray that fits inside the freezer interior (safe for heat)
- Kitchen towels or large absorbent cloths
- Rags or sponges
- A bucket or tray to catch runoff water
- Silicone spatula or plastic scraper (soft, non-metal)
- Optional: Fan or blower (small countertop fan)
- Optional: Flexible tubing / heat‑resistant hose for targeted melt
Preparation Steps (Before You Begin)
- Empty or relocate items
Move as many frozen items as possible out (into a cooler, secondary freezer, or insulated boxes). The less obstruction, the faster the heat is distributed. - Turn off or unplug the freezer
Safety first. Turning off prevents unwanted cold battling your defrost, and avoids electrical hazards. - Protect the floor
Place towels, cloths, and trays to catch water that will drip out. A drip path or tray beneath the freezer door is wise. - Open doors / drawers
Open or remove drawers, shelves, barriers inside, so everything is exposed. Ice under drawers or walls needs access. - Position your pan/tray
Place the shallow pan/tray at the bottom interior center or where ice is thickest. This will collect water directly under melting spots.
Main Defrost Procedure
- Boil water / heat to near boiling
Get your kettle or pot to as hot as possible—ideally boiling. The hotter, the faster the melt. - Pour or pour+trap vapor
Carefully pour some hot water into the tray/pan inside the freezer so that hot steam rises and circulates. Alternatively, if your freezer has an enclosed top shelf or cavity, suspend or place the pot/pan of hot water there to let vapor fill the cavity. - Close the door/compartment temporarily
For steam to do its work, you want to trap heat and vapor inside the closed freezer space for a few minutes. The warm moist steam attacks ice surfaces evenly. (Be cautious—temperatures rise, don’t overdo, and keep a quick-access path.) - Wait 5–10 minutes
Let the steam penetrate the frost. As ice softens, it begins to loosen its bond to the freezer walls or coils. - Gently scrape / direct melt
Use a soft (non-metal) scraper, or use a sponge/cloth to sweep softened ice toward your collection tray. Avoid sharp tools that scratch walls. - Repeat if necessary
For thicker ice, you may repeat the steaming once or twice in targeted zones. Use fresh hot water each time. - Dry & ventilate
Once most ice is melted or broken loose, mop up water, dry the surfaces with towels or rags. Leave doors open momentarily to air out and evaporate residual moisture. - Power back on / restabilize
Plug or turn the freezer back on. Let it cool down empty or with minimal load for a short time before restocking.
In many cases you can remove 50–80% of frost within 10 to 20 minutes, depending on ice thickness and configuration.
Why This Trick Works: The Science Behind Rapid Defrost
Understanding why this method outpaces passive defrost helps you tweak and trust the approach.
Vapor + Latent Heat Transfer
- Steam carries latent heat, which is the energy required to change water from liquid to gas. When steam contacts ice or cold metal surfaces, it condenses back to water, releasing that heat. That heat helps melt the ice layer efficiently.
- The moisture in steam also helps break the bond between ice and surface by creating a thin water film that reduces adhesion.
Heat Trapping & Enclosure
- By closing the freezer during steaming, you trap warm humid air, preventing heat loss to the surroundings. That gives the ice time to respond uniformly.
- The enclosed environment increases vapor concentration and uniformity of melt.
Heat Conduction via the Tray/Water
- The tray of hot water radiates heat upward. The water in the tray is also warm, which can conduct heat through metal surfaces and enhance melt at the base.
- As ice begins melting, water conducts further heat into contacting ice surfaces, accelerating the melt.
Controlled Scraping / Mechanical Assistance
- The soft scraper or spatula is used after some softening, so it doesn’t fight rigid ice. That dramatically reduces labor compared to brute force chipping.
- The melted areas reduce the obstacle for mechanical removal.
Reapply or Spotlight Steam
- In thick or embedded ice zones, reintroducing fresh hot vapor ensures deeper penetration—like a “spot defrost” approach—focusing where needed.
Efficient Water Removal
- As melted water accumulates, the tray or padding catches it. Removing that melt water quickly reduces refreezing, and avoids sloshing or flooding.
With these principles combined, the process becomes fast and manageable.
Best Practices, Variations, and Enhancements
To make this method even more robust and reliable, here are additional tips, tricks, enhancements, modifications based on your freezer type.
Variation for Upright Freezers vs. Chest Freezers
- Upright freezers: doors open forward; steam moves upward and can trap easily. Use multiple trays at various levels if ice is uneven.
- Chest freezers: steam tends to accumulate at the top; it’s useful to have a compartment or shelf area to position a steaming container high so vapor circulates downward.
Using a Fan or Portable Heater to Boost Vapor Flow
- A small fan (non-metal) placed outside the freezer aimed inward can help circulate warm vapor and speed infiltration.
- Alternatively, a safe low-wattage heater or heat gun in short bursts (with caution, not too close to surfaces) can help melt stubborn spots.
Directed Vapor via Flexible Hose / Tubing
- If your freezer has narrow areas or deep corners that are hard to reach with steam, you can run a heat-safe hose or tubing into those zones, directing warm vapor or hot water spray precisely.
- This method ensures the steam doesn’t dissipate before entering tight crevices.
Adding Salt or Baking Soda (Cautiously)
- Some people lightly sprinkle a bit of salt or baking soda in the water/steam assembly to slightly depress freezing point or buffer melt—but use minimal amounts and ensure it does not corrode metal surfaces.
- Warning: avoid getting salt or baking soda directly on interior walls or coatings, which may damage surfaces. Use always in the water/steam tray or dilute zone.
Pre‑Treated Surfaces
- Before frost forms, coat interior surfaces lightly with food-safe silicone spray or freezer-safe lubricant (check your freezer manufacturer’s recommendations). That can reduce ice adhesion, making future defrosting easier.
- Some use a thin layer of paraffin or petroleum jelly (in tiny amount) on walls to reduce sticking; use very sparingly and avoid interfering with food or gasket.
Multi‑Stage Cycle: Steam → Scrape → Steam → Dry
For thick, persistent ice, use a two-stage approach:
- Initial steam + melt for 5–7 minutes
- Scrape softened parts
- Second steam pass targeting remaining stubborn spots
- Final dry and cleanup
This incremental strategy avoids overexposing components to extreme heat or moisture all at once.
Use of a Hot Towel or Cloth in Tight Spots
- For narrow frozen zones, wrap a towel in hot water, wring it to drip, and press it against ice patches momentarily to help soften before scraping.
- This localized heat helps in pockets or corners where steam circulation may be weaker.
Safety Precautions & What Not to Do
Because you’re using hot water, steam, and working indoors, careful attention to safety is critical.
Heat / Steam Safety
- Never touch metal surfaces or walls that may be hot from steam.
- Avoid directing steam at your face or hands.
- Use heat-resistant gloves or potholders.
- Don’t overfill or overflow trays—steam should not leak into door edges or gasket zones excessively.
Electrical Safety
- Always unplug or disable the freezer before starting. Never let water or steam contact active electrical components.
- Be cautious with appliance wiring, heater cords, or lights inside the freezer.
- Avoid letting water reach insulation or wiring behind walls.
Avoid Sharp Tools or Metal Scrapers
- Metal scrapers can gouge walls, damage interior finish, or puncture insulation. Use soft plastic, silicone, or plastic tools.
- Avoid forceful prying; let steam loosen first.
Avoid Sudden Thermal Shock
- Don’t pour boiling water onto extremely cold glass, plastic, or enamel surfaces in one go—this could warp or crack them.
- Warm water or a moderated approach is safer.
Ventilation Control
- If your kitchen is small or enclosed, be aware steam may fog windows or raise humidity. Ensure ventilation so moisture doesn’t condense on other surfaces.
- Mop up drips quickly to avoid slippery floors.
Don’t Leave the Freezer Sealed for Too Long
- While you trap vapor, don’t leave the door fully shut for prolonged times (unless necessary). Keep an eye on internal temperature or buildup.
- Overexposure to heat may damage some interior finishes if mistreated.
Post‑Defrost Steps & Recovery
After you’ve cleared the ice, don’t just shove your frozen goods back in. A careful restart ensures you don’t repeat the cycle too fast.
Dry Thoroughly
- Use clean, dry towels or cloths to wipe every exposed surface, corners, shelves, gaskets, walls.
- Leave the door (or drawers) open for 10–15 minutes to air-dry residual moisture and allow residual steam to evaporate.
- If available, use a fan nearby to speed drying.
Inspect & Clean Gasket, Seals, Drains
- Clean the door gasket with a mild, non-abrasive wipe.
- Examine the seal tightness when closing the door—there should be a solid lighting or seal contact.
- Check the drain hole or tube (if your freezer has one) to ensure it’s clear and not blocked by debris or leftover ice.
Power Back On & Stabilize Before Restocking
- Plug the freezer back in, set it to normal temperature.
- Let it run (empty or minimal load) for 1–2 hours to bring internal temperature down and stabilize.
- Confirm that it’s cold enough (freezing temperature) before reloading frozen items.
- Restock foods in a way that maintains airflow (don’t jam tightly).
Monitor for Leaks and Condensation
- Keep an eye around the base, floor, back, and sides for water drips or condensation.
- If you notice liquid, address it immediately—don’t wait until frost builds again.
- If your freezer has a drip tray, empty and dry it.
Maintenance & Habits to Keep Your Freezer Ice-Free
Here’s how to prevent big ice build-ups and reduce the need for your rapid defrost method in the future.
1. Regular “Mini Maintenance” (Every 2–4 Weeks)
- Wipe interior surfaces lightly with damp cloth (without harsh soap).
- Spot-check for frost in corners or under drawers—remove early when thin.
- Clean the top edge of gasket & door frame to maintain good seal.
- Ventilate or fan the area behind the freezer to reduce ambient moisture.
Click page 2 for more