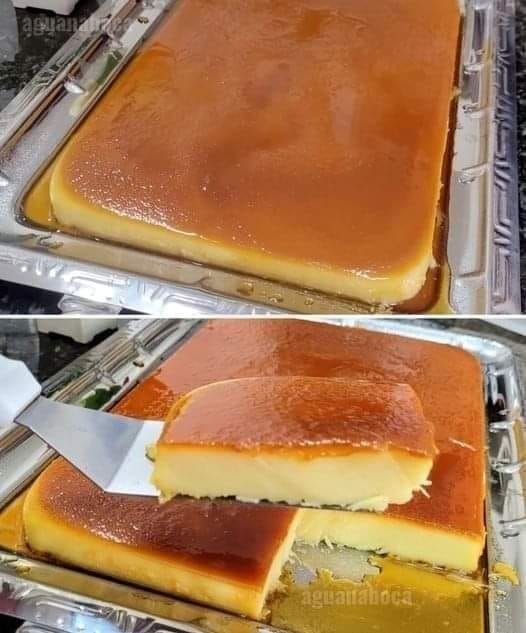
Pudding is a timeless dessert that has captured the hearts and taste buds of generations. Whether you’re craving something sweet, silky, and smooth, or looking for a dessert to impress guests without much effort, pudding is always a winning choice. What’s even better? You can create a super creamy, melt-in-your-mouth pudding without needing an oven and with just four simple ingredients. That’s right—this recipe requires no complicated techniques, and you don’t have to worry about preheating the oven or overbaking.
In this article, we’ll guide you step-by-step on how to make an incredibly creamy, delicious pudding with just four ingredients. We’ll also provide plenty of tips, variations, and serving suggestions to help you take this humble dessert to the next level. Whether you’re a seasoned cook or a beginner, this recipe is designed to be easy, fun, and foolproof. Let’s dive into how you can create the ultimate creamy pudding from scratch!
Why Make Pudding at Home?
Pudding is often something you might pick up from a store when you’re craving a sweet treat, but making it at home brings a different level of satisfaction. Here are a few reasons why you should consider making pudding yourself:
1. Customizable Flavors:
When you make pudding at home, you can play with different flavor profiles. Want to add a hint of vanilla, chocolate, or even caramel? The possibilities are endless. You can also control the sweetness level, ensuring that it’s just the way you like it.
2. Simple and Quick:
Our version requires no baking, no complicated steps, and minimal ingredients. In less than 30 minutes, you can have a delicious, creamy dessert ready to enjoy. It’s the perfect treat for when you need something sweet but don’t want to spend a lot of time in the kitchen.
3. Better Ingredients:
When you make your own pudding, you have full control over the ingredients. You can use natural, high-quality ingredients such as whole milk, organic sugar, or even dairy-free substitutes. This ensures that you’re consuming a dessert that’s made with love and care, rather than artificial additives or preservatives.
4. Affordable:
The ingredients in this pudding recipe are both easy to find and inexpensive. You don’t need any fancy kitchen tools or expensive ingredients to create a delicious homemade treat. It’s a budget-friendly dessert that doesn’t compromise on flavor or creaminess.
5. Perfect for Any Occasion:
Whether you’re preparing a special dessert for a family dinner, hosting a small gathering, or just need a late-night snack, homemade pudding is perfect for any occasion. It’s also a fantastic dessert to prepare ahead of time for parties, as it can be made and stored in the refrigerator until you’re ready to serve.
The 4 Simple Ingredients You Need
The best part about this recipe is that you only need four simple ingredients to create a smooth, creamy pudding. Forget about measuring out a dozen different ingredients or hunting for obscure items in specialty stores. These are common pantry staples that you likely already have in your kitchen. Let’s take a look at them:
1. Milk (Whole or Plant-Based)
Milk is the base of the pudding, providing it with its rich, creamy texture. While whole milk creates a luscious and creamy pudding, you can also use plant-based milks like almond, soy, or oat milk to cater to dietary preferences. If you choose plant-based options, just make sure to use the unsweetened versions to avoid making the pudding too sweet.
2. Sugar
Sugar is the sweetener of choice for this recipe. You can use granulated sugar, brown sugar, or even alternatives like honey or maple syrup for a more natural sweetness. Keep in mind that different sweeteners can affect the flavor of your pudding, so choose one that suits your personal taste.
3. Cornstarch
Cornstarch is the magic ingredient that will give your pudding its thick, velvety consistency. It helps to set the pudding as it cools, ensuring that it has a smooth, creamy texture. You don’t need a lot—just a couple of tablespoons are enough to transform your mixture into a luscious dessert.
4. Vanilla Extract
Vanilla extract adds a warm, aromatic flavor that elevates the pudding to the next level. It gives the dessert that comforting, familiar taste we all love. Vanilla extract is a pantry staple that adds depth to both baked and non-baked desserts. You can use vanilla bean paste or even scrape the seeds from a vanilla pod if you want an extra luxurious touch.
How to Make Super Creamy Pudding Without an Oven
Now that we’ve covered the ingredients, let’s walk through the steps to create your super creamy pudding in no time. This recipe is easy to follow, and you’ll be able to whip it up in 15 to 20 minutes.
Ingredients:
- 2 cups of whole milk (or your preferred plant-based milk)
- 1/2 cup of granulated sugar (adjust for sweetness)
- 3 tablespoons of cornstarch
- 1 tablespoon of vanilla extract
Equipment:
- Medium-sized saucepan
- Whisk
- Measuring cups and spoons
- Heatproof bowls or ramekins for serving
- A spatula (optional)
- Fine mesh sieve (optional)
Instructions:
Step 1: Mix the Dry Ingredients
In a small bowl, combine the cornstarch and sugar. Stir them together to make sure they’re well mixed. This will help prevent any lumps when you add the dry ingredients to the milk.
Step 2: Heat the Milk
In a medium-sized saucepan, pour in the milk. Place the saucepan over medium heat and begin to warm the milk. Stir occasionally to ensure the milk doesn’t scorch at the bottom. You want the milk to be hot but not boiling. Heating the milk gradually helps the cornstarch dissolve more evenly.
Step 3: Add Dry Ingredients to the Milk
Once the milk is hot (but not boiling), gradually whisk in the dry sugar and cornstarch mixture. Continue to stir constantly to prevent any lumps from forming. You want the sugar and cornstarch to dissolve fully into the milk to create a smooth base for your pudding.
Step 4: Thicken the Pudding
Keep stirring the milk mixture as it heats. After a couple of minutes, you’ll notice the pudding begin to thicken. As soon as the mixture coats the back of the spoon and reaches a custard-like consistency, it’s time to remove the saucepan from the heat. This will only take about 5–7 minutes, so keep an eye on it to avoid overcooking.
Step 5: Add Vanilla Extract
Once the pudding has thickened, stir in the vanilla extract. This will add that signature comforting flavor to your dessert. If you prefer a richer flavor, you can add a little extra vanilla, but be careful not to overpower the other ingredients.
Step 6: Cool and Serve
Once the vanilla is incorporated, allow the pudding to cool slightly before serving. You can transfer the pudding to individual bowls, ramekins, or glasses. Let the pudding sit at room temperature for a few minutes, then refrigerate for at least 1-2 hours before serving for the best texture and flavor. If you want a skinless pudding, you can place plastic wrap directly on top of the pudding to prevent a film from forming as it cools.
click page 2 to continue