Before diving into the fix, it helps to understand why caulk fails in wet zones. When you know the triggers, you can address root causes—not just patch the symptom.
1. Moisture, humidity & lack of ventilation
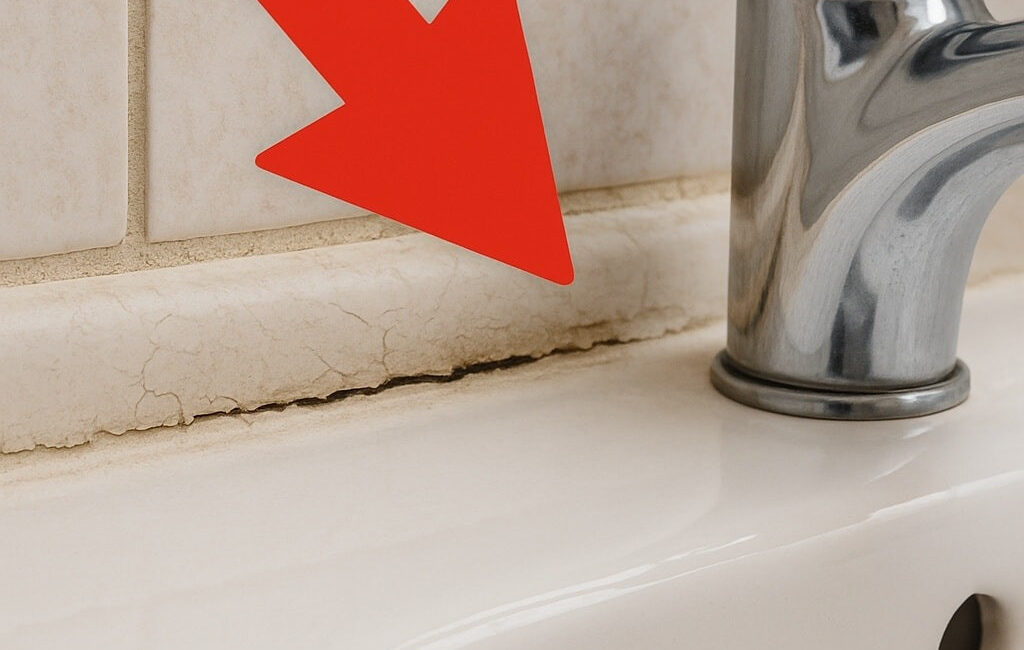
Bathrooms are high‑moisture zones. Over time, steam, splash water and condensation accumulate in corners, along joints and behind fixtures. This repeated moisture weakens caulk adhesion and invites mould or mildew. When that happens, what started as a tiny hairline crack can widen into gaps, peeling, or water infiltration.
2. Movement and shifting of materials
Tiles, tubs, walls and floors expand and contract slightly due to temperature changes, water load (e.g., filling a bath), settling of the house, vibrations or use. Caulking must accommodate this movement. If the caulk lacks flexibility (or is poorly applied) then cracks develop around corners, corners of tubs, or vertical joints.
3. Using the wrong type of caulk
If an ordinary acrylic caulk is used in a shower/tub environment, it will often crack or shrink. In contrast, high‑quality silicone or specialty “kitchen/bath” sealants are built to resist moisture, retain flexibility and resist mould. Using the wrong product is a frequent cause of early failure.
4. Improper surface preparation
Old caulk left in place, residues of soap scum, mildew or even dust will prevent good adhesion. If cracks start not because of the caulk itself but because it never properly bonded, the result is premature failure. Often you’ll see the caulk peeling away from one edge or the substrate.
5. Incorrect application or finishing
Messy beads, too much or too little caulk, inadequate smoothing, lack of taping or curing too soon—any of these can lead to inferior finish and early cracking. When joints aren’t well filled or the bead is irregular, stress concentrates in weak spots and the crack opens.
6. Age & wear
Even the best caulk has a service life. After many years, UV exposure (if the bathroom gets direct light), cleaning chemicals, repeated wet/dry cycles and simple material ageing cause shrinking, loss of elasticity, discolouration and eventual cracking.
Understanding these triggers means you can plan a fix that lasts, not just a cosmetic patch.
The Quick Fix You Can Do Right Now
If the crack is small and currently you need a fast temporary remedy while scheduling a full repair, here’s a quick “first‑aid” fix. Note: This is an interim solution—not a substitute for full replacement when needed.
- Clean the area – Use a damp cloth and mild detergent to wipe around the cracked caulk. Remove any loose bits of caulk, peel back edges if they’re lifting. Then pat dry.
- Apply light antiseptic / mould cleaner – If you see dark spots or suspect mould, apply a mild bleach solution (or a commercially rated bathroom mould cleaner). Let sit per instructions, rinse, and dry thoroughly.
- Use a sealant filler – In mild crack cases (hairline or very small splits), you might use a thin bead of flexible bathroom‑rated silicone or a sealant pen to fill the crack. Smooth lightly with a damp finger or a specialist smoothing tool.
- Allow sufficient curing before high use – Avoid heavy water exposure for the period recommended by the sealant product (often 24 hrs).
- Ventilate & monitor – Make sure the room is ventilated (turn on fan, open a window) so moisture doesn’t linger directly on the repair. Check daily to see if the repair holds or the crack widens again.
This gives you a stop‑gap fix. But if the crack is wide, or you see separation, peeling, mould or multiple failing joints, you’ll want to plan for a full renewal.
Full Renewal: Step‑By‑Step Guide for Long‑Term Repair
For cracked caulking that’s beyond “just a small split,” you’ll achieve the best results by removing the old, preparing the surface properly, applying the correct product and finishing well. Here’s how:
Step 1: Remove all the old caulk
- Use a utility knife, a razor scraper or a dedicated caulk removal tool to cut and pull out the existing caulking. Be careful not to scratch tile, acrylic tub surfaces or adjacent walls.
- Remove all old material—don’t just apply new over old. The old layer often has adhesion loss, mould, hidden moisture or gap behind it.
- After removal, vacuum or wipe away dust, residue, small bits of the old bead.
Step 2: Clean and dry the surfaces
- Clean the gap thoroughly with a solution of water + mild detergent or a bathroom cleaner. If mould or mildew is present, treat it (e.g., bleach‑water mix, or mould‑specific solution).
- Rinse off any cleaning solution and let the joint dry completely. Moisture trapped in the joint will undermine the new sealant.
- Use rubbing alcohol (isopropyl) to wipe the surfaces if possible. This removes soap film, oils, residual salts and improves adhesion.
Step 3: Mask & prepare for neat application
- Apply painter’s tape along both edges of the gap you’re sealing. This helps you maintain straight, clean lines and avoids excess spread onto tile or walls.
- Choose the correct nozzle angle—cut the caulk tube at approximately 45° and select an opening size that matches the joint width.
- Have your smoothing tool or wet finger ready, along with a damp cloth for cleanup.
Step 4: Choose the correct sealant
- For bathrooms (shower niches, tubs, sinks), choose a 100% silicone sealant labelled for bath / kitchen use. Many such products include mould & mildew resistance.
- If you prefer paintable, use a siliconized‑latex caulk (though full silicone is more durable in wet zones).
- Ideally choose a colour that matches your surroundings (white, clear, tile colour) so the seam is visually discreet.
Step 5: Apply the new caulk
- Load the cartridge into a caulk gun (if applicable). Place the nozzle into the joint at the start, squeeze with steady pressure, and move the bead smoothly along the seam at a consistent pace.
- Push the caulk gun forward (rather than pulling) so the bead is forced into the gap and adheres properly.
- As soon as you finish the bead, tool it (smooth it) using a caulk finishing tool or your finger (dipped in soapy water or rubbing alcohol) to create a smooth concave or flat profile, consistent with adjacent lines.
- Immediately after smoothing, remove the painter’s tape by pulling at a 45° angle away from the bead.
Step 6: Allow full curing
- Even if your product says “shower‑ready in 1 hour,” full cure often requires 24–48 hours (or more in high humidity). Avoid significant water spray or bath sessions during this time.
- Maintain room ventilation, avoid direct heat blasts (which can dry the bead too fast and crack it), and keep the area dry.
Step 7: Final clean‑up and inspection
- Once cured, wipe around the joint to clean any residual caulk film or smudges.
- Inspect the bead: it should be fused to both sides (tile and tub or wall), with no gaps, pin‑holes, or bubbles.
- Check the joint again after a week of use: if no separation, discoloration or mould has occurred, you’ve succeeded.
Pro Tips & High‑Value Techniques for Longevity
To ensure your repair lasts for years (rather than months), consider these elevated techniques and attention to detail:
Choose a premium caulk brand
Cheap sealants may save money upfront but fail earlier. Investing in a quality product rated for bathrooms and high‑moisture zones pays off with greater durability, fewer mould issues and stronger adhesion.
Match joint width and bead size
Proper sizing matters. If the joint is wide (more than ~5 mm), you might need a back‑er rod (foam filler) before sealing so the bead doesn’t sag or exceed designed depth. A too‑large gap will stress the caulk and cause early cracking.
Ensure proper movement accommodation
If you know the substrate will move (acrylic tubs, wallboard flexing, frequent temperature cycles), use a flexible sealant with high elongation. Some high‑stretch caulks are designed to flex 25–50% or more without cracking.
Maintain proper ambient conditions during application
Applying in cold, windy, humid or low‑temperature conditions reduces performance. Ideal conditions: ~10–30 °C, good air circulation, humidity moderate. If the bathroom is hot and steamy, finish caulking and allow time before heavy use.
Ventilation upgrade
Persistent moisture behind walls or along joints degrades any caulk fast. Make sure your bathroom has an adequate exhaust fan, open windows after use, avoid leaving water pooled in tub edges or around fixtures. Proper ventilation extends caulk life.
Maintenance inspection
Every 12–18 months, inspect the bead for signs of fatigue: small cracks, lifting edges, discoloration, soft spots. Early touch‑up can prevent full renewal. Apply a fresh thin bead if joint is still healthy but shows early wear.
Clean gently
Avoid harsh chemical cleaners with bleach or ammonia regularly along the caulk line. These chemicals can degrade silicone or latex over time. Use mild detergents and rinse thoroughly. Make sure you dry out the joint after showers.
Common Mistakes That Lead to Cracked Caulking
Avoiding these pitfalls will save you time, cost and frustration.
- Applying new caulk over old without removal: This is the single biggest mistake. The new bead won’t adhere properly and will fail almost as quickly.
- Using the wrong product type: For example, acrylic caulk in high‑moisture zones will shrink or fail; not selecting mould‑resistant sealant is a risk.
- Poor surface prep: Leaving behind old caulk residue, soap film, dust or moisture results in weak adhesion.
- Cutting nozzle too wide / applying too much caulk: Overly thick beads don’t cure properly or adhere well; they also look messy and trap moisture.
- Not smoothing the bead immediately: Skipping tool‑finishing leaves uneven profile, gaps or poor bonding.
- Using bathroom too soon: If you shower or fill the tub before the sealant fully cures, you compromise the fresh bead.
- Ignoring foundational issues: If the tub itself shifts, or if water is leaking behind the joint, even the best caulk fails quickly. Address underlying movement or support issues.
- Poor ventilation: When moisture lingers, the joint is repeatedly stressed and mould can grow behind the seal, pushing it out.
High‑CPC Keywords That Matter for This Topic
For anyone searching for professional or premium solutions, long‑term durability, waterproofing, mould‑resistant sealants, bathroom renovation, etc., these keywords carry value and relevance:
- bathroom caulking replacement
- tub shower waterproof sealant
- mould resistant silicone sealant bath
- high performance bathroom caulk
- crack repair bathroom caulk
- bathroom caulk renewal kit
- flexible sealant bathroom walls
- professional caulking tools bathroom
- tub wall joint restoration
- long lasting silicone bathroom caulk
- bathroom sealant failure causes
- DIY bathroom caulk fix
- bathroom moisture damage sealant
- best caulk for bath and tile
- bathroom renovation waterproofing tips
When optimizing content for online search or curating resources, these phrases align with homeowner intent, home improvement investment, and premium repair solutions.
Real‑Life Example: How a Cracked Caulk Became a Big Problem and How It Was Fixed
Let’s walk through a real‑life scenario to illustrate the process and show its importance.
Scenario
A homeowner notices a fine hairline crack along the joint where an acrylic bathtub meets tiled wall. Initially the crack seemed cosmetic, but over time it widened, black mould started appearing in the seam, and moisture behind the tile started causing soft drywall beneath the top row of tiles.
Diagnosis
- The bathtub flexed slightly under water weight (acrylic panel) so the original caulking, which was a generic latex product, stretched poorly and cracked.
- The joint had old caulk applied on top of earlier caulk (no removal).
- Ventilation was minimal; steam lingered after each use and dried slowly.
- The existing caulk was starting to detach and mould had penetrated under it.
- Tiles above the joint had slight movement because the drywall backing had begun to absorb moisture.
Solution implemented
Click page 2 for more