Condensed milk is one of those quiet kitchen staples that hides in plain sight. It doesn’t shout for attention like chocolate or vanilla, yet it shows up everywhere: desserts, pastries, sauces, drinks, traditional sweets, and comfort recipes passed down through generations. It adds richness without effort, sweetness without complexity, and structure to recipes that would otherwise fall flat.
And yet, most people only know it as something that comes from a can.
What almost no one realizes is that condensed milk does not need factories, preservatives, or long ingredient lists. In its purest and most traditional form, condensed milk is nothing more than milk and sugar, gently transformed by time and heat.
This homemade 2-ingredient version brings condensed milk back to its roots: simple, economical, customizable, and deeply satisfying. Once you understand how it works, it becomes less of a recipe and more of a technique you can rely on for years.
WHAT CONDENSED MILK REALLY IS (AND WHAT IT IS NOT)
Condensed milk is often confused with evaporated milk, but they are not the same thing.
Condensed milk is milk that has had a large portion of its water removed through slow heating, then sweetened with sugar. The sugar is not just for taste; it plays a structural role. It thickens the milk, stabilizes it, and gives it that signature glossy, spoon-coating texture.
Traditional condensed milk was invented as a preservation method long before refrigeration. Sugar acted as a natural preservative, allowing milk to last much longer without spoiling. What we buy today in cans is simply the industrialized version of that old process.
When you make it at home, you’re essentially recreating that original technique—without additives, emulsifiers, or unnecessary processing.
WHY HOMEMADE CONDENSED MILK MAKES SENSE
There are three major reasons people fall in love with homemade condensed milk once they try it.
The first is control. You decide how sweet it is, how thick it becomes, and what type of milk you use. Full-fat, semi-skimmed, lactose-free, or even plant-based alternatives can be adapted.
The second is cost. Store-bought condensed milk may seem inexpensive, but over time it adds up—especially if you bake often. Milk and sugar are almost always cheaper than packaged specialty products.
The third is flavor. Homemade condensed milk tastes fresher, creamier, and cleaner. There is no metallic aftertaste from cans, no artificial notes, and no excessive sweetness unless you want it.
THE BEAUTY OF A 2-INGREDIENT RECIPE
In an era of complicated recipes and long ingredient lists, there is something deeply reassuring about needing only two ingredients.
Milk provides the body, creaminess, and natural sugars.
Sugar provides sweetness, thickness, and preservation.
That’s it.
No cornstarch. No cream. No powdered milk. No stabilizers.
Just patience and attention.
INGREDIENTS YOU NEED
You only need:
• Milk
• Sugar
The quality of these two ingredients matters more than quantity. Whole milk produces the richest result, but lower-fat milk will still work if reduced long enough. White sugar is traditional, but other sugars can subtly change flavor and color.
The magic is not in what you add—it’s in what you remove: water.
HOW THE TRANSFORMATION HAPPENS
The process relies on slow evaporation.
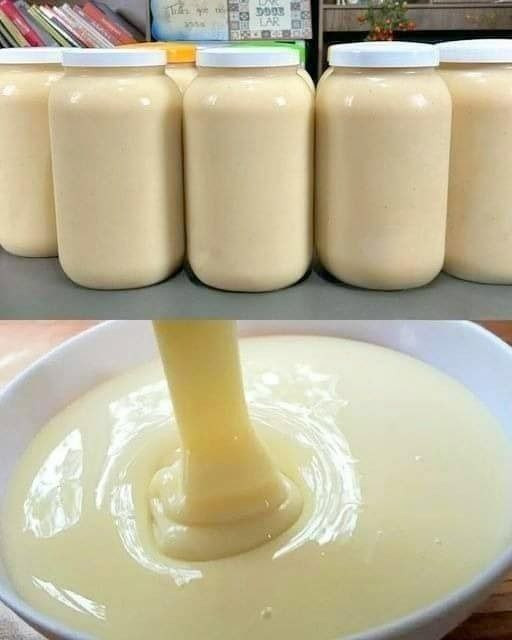
As milk heats gently, water escapes as steam. The milk solids concentrate. Sugar dissolves and binds with milk proteins. Over time, the mixture thickens and darkens slightly, developing that familiar condensed milk texture.
Rushing this process with high heat is the most common mistake. High heat scorches milk, alters flavor, and creates graininess. Low, steady heat is what creates silkiness.
This is why condensed milk rewards patience. It cannot be bullied into existence.
STEP-BY-STEP: MAKING CONDENSED MILK AT HOME
Start by pouring milk into a heavy-bottomed saucepan. This type of pan distributes heat evenly and reduces the risk of burning.
Add sugar and stir gently until fully dissolved before turning on the heat. This ensures even sweetness and prevents crystallization later.
Click page 2 to continue