Harnessing solar energy to heat water is one of the smartest and most sustainable ways to decrease your household energy consumption. This solar water heater DIY project uses recycled plastic bottles to build a cost-effective solar collector that heats water using sunshine and thermosiphon physics. The result is hot water with minimal electricity or gas usage—perfect for outdoor showers, pre‑heating, or small household uses.
In this detailed tutorial you’ll learn:
- Why plastic bottle solar collectors work
- All required materials and tools
- Step‑by‑step construction of the system
- Tips for maximizing performance
- How the thermosiphon circulation works
- Seasonal maintenance and troubleshooting
- Safety and environmental considerations
By the end of this guide, you’ll be equipped with everything needed to construct, maintain, and maximize a sustainable water heating system built from repurposed bottles and simple plumbing.
1. Why Use a Solar Water Heater Made from Plastic Bottles?
1.1 Eco‑friendly & Sustainable
Recycling plastic soda bottles into a solar water heater helps reduce waste while producing hot water—turning discarded material into clean energy.
1.2 Low‑cost, Accessible Materials
Nearly everyone can collect 2‑liter plastic bottles, source black paint, PVC pipe, hose clamps, foam insulation, and plywood—all affordable and readily available.
1.3 Simple Physics, Big Results
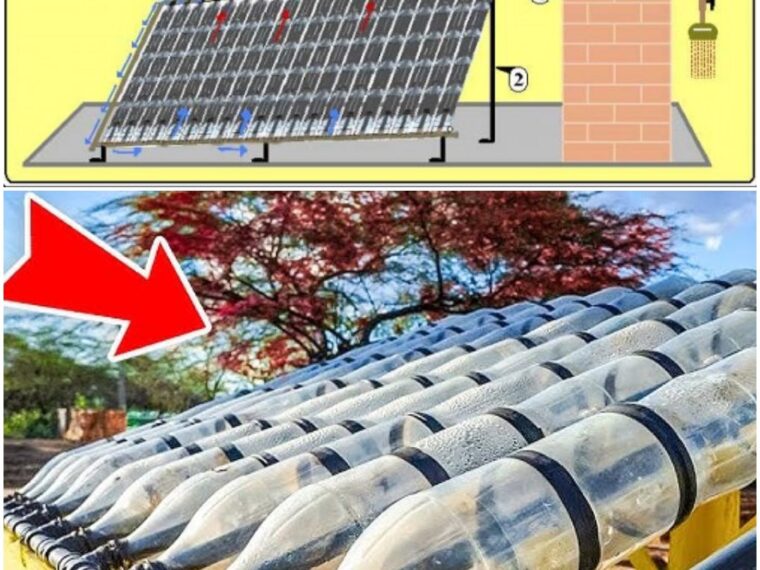
The principle is straightforward: black surfaces absorb sunlight, heat the water in contact, and because warm water rises (thermosiphon effect), hot water circulates upward naturally with no pump.
1.4 Practical Supplemental Heating
While this method doesn’t fully replace a conventional electric or gas water heater, it can significantly reduce usage and provide renewable hot water in sunny climates, especially during midday hours.
1.5 Educational and Hands-on
This project is ideal for DIY enthusiasts, schools, community workshops, or anyone interested in practical renewable energy systems.
2. How the Bottle-Based Solar Collector Works
- Black-painted bottles absorb solar radiation, converting it into heat.
- Water inside PVC pipes in contact with those heated bottles warms up.
- Thermosiphon flow—warm water rises and exits through the top outlet, drawing in cold water at the bottom.
- Insulation minimizes heat loss, preserving elevated water temperature between uses.
- The system relies on passive circulation, no electrical components required.
For sunny days, you can expect water temperatures of 45–55 °C (113–131 °F) depending on bottle count, insulation, and sun intensity.
3. Materials & Tools You Will Need for Your Bottle Solar Heater
| Component | Description |
|---|---|
| Plastic bottles (2 L) | Large quantity (50‑200 bottles depending on scale); clear, cleaned, and dried |
| Black outdoor paint | Non‑toxic, weather‑resistant (multiple thin coats) |
| PVC pipes & fittings | Main inlet/outlet pipes, T‑connectors sized to bottle neck |
| Hose clamps | Secure bottles to pipe snugly; stainless steel preferred |
| Plywood or rigid backing board | Strong, weather-treated surface for mounting bottles |
| Insulating material | Foam board, fiberglass, or rigid foam behind bottles |
| Fasteners | Screws or bolts suitable for outdoor mounting |
| Tools | Saw (wood or PVC), drill, screwdriver, wire cutter, measuring tools |
4. Step‑by‑Step Assembly Instructions
4.1 Clean and Paint Bottles
- Remove labels and adhesive residue completely.
- Wash with soapy water, rinse and dry thoroughly.
- Apply black paint to the exterior—in several thin coats for even coverage and durability.
4.2 Create the Bottle‑Pipe Core
- Cut off the bottom of each bottle to allow the pipe to slide in.
- Pass a length of PVC pipe through the neck of each bottle.
- Insert bottles in sequence, spacing them snugly.
- Use T‑connectors between sections to distribute water evenly into each bottle row—ensuring good flow continuity.
- Tighten hose clamps around bottle necks and pipe to prevent leaks.
4.3 Build the Support Structure
Click page 2 for more