Growing your own ginger (Zingiber officinale) and turmeric (Curcuma longa) at home is easier than you might think, even if you don’t have a large garden. Using a wooden box as a planter lets you control drainage, soil quality, and moisture—key factors for cultivating these tropical rhizomes. This comprehensive guide walks you through every step, from preparing your wooden box to harvesting your very own fresh, organic ginger and turmeric.
1. Why Grow Ginger and Turmeric in a Wooden Box?
Benefits of This Method
- Perfect drainage control: The wooden box combined with layers of wood and a plastic liner ensures water doesn’t pool around the roots, preventing rot.
- Ideal for small spaces: Perfect for balconies, patios, or indoor growing setups.
- Light, well-aerated soil: Encourages healthy root and rhizome development.
- Year-round freshness: You can harvest as needed, enjoying the full health benefits of fresh roots.
- Economical and sustainable: Reuse wooden crates and save money by growing your own organic spices.
These rhizomes are rich in antioxidants and anti-inflammatory compounds—ginger’s gingerol and turmeric’s curcumin—making them powerful allies for health and cooking.
2. Preparing Your Wooden Box
2.1. Protecting the Wood and Ensuring Drainage
Before planting, it’s essential to prepare your wooden box properly to protect the wood and provide excellent drainage.
- Line the bottom and sides: Use a sturdy plastic sheet or tarp to line the inside of the box. This protects the wood from moisture and decay.
- Create drainage holes: Carefully poke several drainage holes in the plastic lining using scissors or a sharp tool, aligning with holes in the wooden box bottom if it already has any. This allows excess water to escape, preventing soggy soil and root rot.
- Add a drainage layer: Place a 3–5 cm layer of small branches, twigs, or coarse wood chips at the bottom. This “drainage bed” improves airflow and prevents waterlogging.
2.2. Preparing the Soil Mix
Ginger and turmeric prefer loose, well-drained, and nutrient-rich soil.
- Mix 70% quality potting soil with 30% perlite or vermiculite. This combination ensures good aeration and moisture retention without becoming heavy.
- Add organic matter: Incorporate about 10% compost or well-aged manure to enrich the soil with nutrients.
- Moisten the soil slightly before planting; it should feel damp but not muddy.
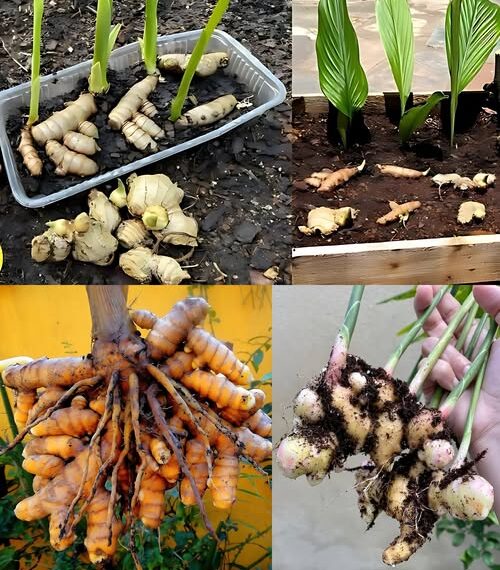
3. Preparing the Ginger and Turmeric Rhizomes
3.1. Selecting Healthy Rhizomes
- Choose firm, plump rhizomes without signs of mold or shriveling.
- Look for “eyes” or buds on the rhizomes—these are where shoots will sprout.
- Buy organic rhizomes if possible, to avoid pesticides.
3.2. Pre-Soaking to Stimulate Growth
- Soak the rhizomes in warm water (around 20–25 °C) for 12 to 24 hours. This jump-starts sprouting.
- Drain and pat dry before planting.
3.3. Dividing the Rhizomes
- Cut the rhizomes into 5–7 cm segments, ensuring each piece has at least one healthy bud.
- Let the cut pieces air-dry for a day to prevent rot when planted.
4. Planting Your Rhizomes in the Wooden Box
- Place the drainage layer in the box.
- Fill with your prepared soil mix, leaving 5 cm of space at the top.
- Lay the rhizome pieces horizontally with buds facing up.
- Cover lightly with 2–3 cm of soil.
- Water gently to moisten without overwatering.
5. Care and Maintenance
5.1. Light and Temperature
- Keep your box in a partially shaded area to avoid scorching leaves.
- Ideal temperature: between 20 °C and 28 °C.
- If indoors, a grow light can help supplement natural light.
5.2. Watering
- Water when the topsoil feels dry, but avoid waterlogging.
- During active growth, watering once or twice a week is usually sufficient.
- Reduce watering in autumn as the plant goes dormant.
5.3. Fertilizing
- Feed every 4–6 weeks with a gentle organic fertilizer such as compost tea or diluted manure.
- Avoid excessive nitrogen fertilizer to prevent too much leafy growth at the expense of rhizomes.
5.4. Watch for Pests and Diseases
- Check regularly for aphids or fungal spots.
- Good airflow and proper watering help prevent disease.
6. Growth Timeline and Harvesting
- Shoots appear 10–15 days after planting.
- Leaves grow rapidly over the next 3–6 months.
- Rhizomes mature in about 9–12 months.
- When leaves yellow and die back in autumn, it’s time to harvest.
- Dig up the rhizomes carefully; you can replant a healthy section to start a new cycle.
7. Health Benefits of Homegrown Ginger and Turmeric
- Ginger: Rich in gingerol, it’s excellent for digestion, nausea relief, and reducing inflammation.
- Turmeric: Contains curcumin, a powerful antioxidant known for its anti-inflammatory and immune-boosting properties.
8. Final Tips for Success
- Use a wooden box at least 30 cm deep to allow rhizomes enough room to expand.
- Keep the soil light and well-drained.
- Avoid direct harsh sunlight.
- Be patient—these plants grow slowly but reward you with amazing fresh spices.
Growing ginger and turmeric in a wooden box is a fantastic project for gardeners of all levels, especially those with limited space. With this simple, eco-friendly method, you can enjoy fresh, healthy rhizomes all year round right from your home.