Freezers are indispensable in modern kitchens. They store meat, vegetables, leftovers, ice cream, and all manner of frozen goods that extend shelf life and reduce waste. But every freezer—no matter how well made—eventually suffers from frost and ice buildup. Over time, that crust of ice reduces internal volume, hampers circulation of cold air, forces the unit to work harder, and increases energy consumption. Eventually, thick ice may even interfere with door-seals, drawers, or internal components.
The conventional solution is to power down, unplug, empty the freezer, wait for ice to melt, mop up water, and then restore everything. That process can be tedious, risky (water and power don’t mix well), and dangerous for your frozen food. You may have to transfer all contents to another cooler, deal with partial thawing, or spend hours waiting for things to defrost.
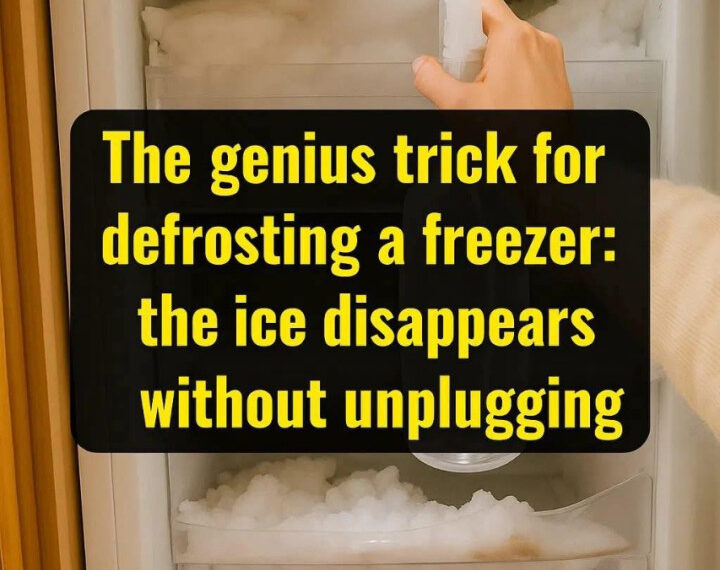
But what if you could coax the ice away while the freezer remains powered? What if you could harness heat and steam strategically—inside the compartment itself—to melt and loosen the frost without ever shutting the appliance off? That’s the trick I’ll teach you here.
This method is a smart blend of thermal physics, controlled moisture, and patience. It’s not magic, but to most users it feels magical: the ice disappears without the headache.
In this article you’ll find:
- The science behind frost buildup
- Why this trick works
- Step‑by‑step instructions (with variations for different freezer types)
- Tips to accelerate the process
- Safety precautions and pitfalls to avoid
- Preventive maintenance to minimize future frost
- Real scenarios, problems, and troubleshooting
Let’s begin by understanding how frost forms inside a freezer and why it can become a persistent problem.
1. Understanding Frost, Ice, and Freezer Dynamics
To appreciate why this trick can work, you need to understand how ice builds up, where it forms, and what forces are at play inside a freezer.
1.1 How Ice Builds Up
Every time you open the freezer door, warm, humid air enters. That moisture, once inside the cold environment, condenses on surfaces (walls, coils, food packages) and freezes. Over time, each entry of humid air deposits a tiny layer of frost. Left unchecked, that becomes a thick layer of ice.
Other contributing factors include:
- Door seal degradation: If the gasket is damaged, cold air leaks out and warm air intrudes, accelerating frost formation.
- Storing warm or moist food: If you place food that’s not fully cooled or is high in moisture, it can contribute internal humidity.
- Frequent door opening: Each opening draws in ambient air.
- Power fluctuations or thermostat quirks: These can cause cycling that encourages frost.
- Automatic defrost system failure: In models with auto‑defrost, if that heater or timer fails, frost accumulates unchecked.
As ice accumulates, it interferes with internal airflow, causes the compressor to run longer, and reduces effective storage volume. That triggers a cycle of inefficiency and worsening frost.
1.2 Challenges of Traditional Defrosting
The standard approach—unplugging, waiting, melting ice, wiping water—is effective but fraught with downsides:
- You must relocate all frozen food (risking thawing).
- It takes many hours (or overnight) for thick ice to melt.
- The melted water can flood your floor or drip into parts of the system.
- You lose cooling while the unit is off.
- Some parts or seals may be stressed when cold transitions rapidly.
Hence the appeal of a method that works without interrupting the power.
1.3 Why Heat, Steam, and Warm Air Can Beat Ice (If Managed Carefully)
Ice melts when its temperature is raised above 0 °C (32 °F). Steam and hot air carry latent heat and thermal energy that can deliver heat gradually, helping convert solid ice to liquid water without abruptly damaging sensitive parts.
By carefully introducing warm humid air or placing heated items inside, you can soften the ice, loosen the bond between ice and surfaces, and make it easier to remove. The key is controlling the heat so it doesn’t stress components or cause condensation in unwanted areas.
This controlled melt‑and‑loosen approach lies at the heart of the “no‑unplug defrost” trick.
2. The Ingenious Trick: Defrosting Without Unplugging
Here is the core concept:
Place containers of hot (not boiling) water inside the freezer compartment to generate steam, trap that steam briefly, then use that warmth to soften and loosen the ice. With scrapers, air circulation, and absorbent towels, you gradually coax the ice to detach—all while the freezer remains energized.
This trick works because:
- The steam condenses on the cold ice surfaces, releasing heat and melting the interface.
- The warm air and latent heat penetrate cracks, fissures, and microgaps between ice and plastic walls.
- The softening allows mechanical removal (scraping) with minimal force.
- Because the freezer stays powered, the internal temperature recovers faster, and frozen items remain colder.
However, implementing it safely and effectively requires care and the right technique. Let me walk you through a full, optimized protocol, including variants, safety margins, workarounds, and precautions.
3. What You’ll Need (Equipment, Supplies, and Preparation)
Before starting, gather the following items:
- Several heat‑resistant bowls, pans, or metal/ceramic containers (not plastic sheets that could warp)
- Water heater or kettle to supply hot (but not scalding) water
- Towels, absorbent cloths, or microfibre towels to catch drips
- A plastic or wooden scraper or spatula (never metal)
- A fan or room‑air blower (optional but helpful)
- A spray bottle (optional, for warm water)
- A bucket or tray for collecting meltwater
- Gloves (rubber or heat-resistant)
- Ice catcher trays or shallow pans to hold blocks of ice once loosened
Before beginning:
- Clear and Organize: Remove any items blocking the area of ice accumulation. (You may leave most frozen food inside but shift them aside for access.)
- Protect the floor: Place towels, mats, or absorbent surfaces beneath and around the freezer door area to catch drips.
- Vent clearance: Ensure air can circulate in front of the freezer (doors can be propped open if needed).
- Raise water temperature: Boil or heat water so it’s very hot—just below boiling is ideal (e.g. ~80–95 °C or ~175–200 °F).
- Prepare to refresh: Plan to refresh the hot water containers as they cool, to maintain steam intensity.
This is your staging phase. Now to the defrosting.
4. Step-by-Step: Defrosting a Freezer Without Unplugging
4.1 Step 1: Turn the Freezer to Its “Warmest” Setting or Defrost Mode
While you will not unplug the appliance, you want to reduce the cooling intensity so the internal cooling elements don’t fight your warming attempt too fiercely. On many freezers, there is a temperature dial or a “defrost” or “off” position (for the cooling function). Set it to the warmest setting (or lowest power) so minimal cooling is active.
By doing this, you reduce the “cold pushback” opposing your steam-based warming approach.
4.2 Step 2: Position Hot Water Containers Inside, Around the Ice
Place one or more bowls or pans of hot water inside the freezer, close to the ice surfaces. The aim is for steam to emanate and build a warm humid microclimate inside the compartment.
- Use stable, flat containers so they won’t tip over.
- Distribute them at different heights if possible (top shelf, middle, bottom) so steam is more evenly applied.
- For thick ice zones, lean a hot, damp cloth (soaked in hot water) against the ice face to help penetration.
Close the door partially or fully (if possible) to trap the steam briefly—but not completely airtight if condensation buildup is a concern. You want limited circulation so the steam does its work.
4.3 Step 3: Wait, Monitor, and Refresh
Wait for 10 to 20 minutes (or more if the ice is thick). During this time:
- The steam condenses, transferring heat and softening the ice–wall interface.
- The surfaces of ice begin to weaken; fissures will open.
- If containers cool down significantly, remove them and replace with fresh hot water to maintain strong steam.
You may hear little drips or see melting forming. This is good.
4.4 Step 4: Use Airflow to Aid Melting (Optional but Powerful)
While the steaming effect works internally, you can optionally position a fan or blower outside the open door, directing warm ambient air into the freezer interior. This pushes additional warm air in, helping melt stubborn edges. A gentle breeze can accelerate thaw without aggressive heating.
Be cautious: don’t push warm air so strongly it condenses water on components or causes dripping onto electrified parts.
4.5 Step 5: Gently Scrape the Loosened Ice
Once you see the ice beginning to loosen, use your plastic or wooden scraper to gently dislodge the softened sections. Do not apply heavy force. Work gradually:
- Start at edges, corners, or where steam was concentrated.
- Let gravity assist; allow loosened ice to break off naturally.
- Use small trays or shallow pans to collect chunks so they don’t fall inside or block drains.
Alternate steaming and scraping in cycles: steam for several minutes, then scrape; repeat until all ice is removed.
4.6 Step 6: Absorb and Drain Meltwater
As ice turns to water, you need to manage the moisture:
- Use towels or absorbent cloths to sponge up surface water.
- Collect larger amounts in trays or buckets.
- Wipe the interior surfaces continuously to prevent refreezing of residual moisture.
If there’s a drain hole at the bottom of the freezer, guide meltwater toward it (if functional). Otherwise, capture manually with trays and towels.
4.7 Step 7: Final Drying and Reset
After all visible ice is gone:
- Wipe down all interior walls, drawers, and trays with dry towels until fully dry.
- Move the temperature control back to its normal freezing setting.
- Replace any food or items you moved aside, reorganizing them to maintain airflow.
- Wait a short while to let the interior cool back to temperature.
If everything was done carefully, you now have an ice‑free freezer without ever unplugging it and minimal risk to your food.
5. Variations, Accelerators & Supplemental Techniques
Depending on the freezer type (upright, chest, drawer style) and ice severity, you may apply variations or additional aids:
5.1 Using Warm Water Sprays or Misting
Fill a spray bottle with warm (not boiling) water and lightly mist stubborn ice patches. The moisture helps the ice bond loosen, especially in tight gaps or corners. Spray, wait a minute, then ease the piece loose.
Be cautious not to oversaturate or flood internal components.
5.2 Wet Towels as Warm Bridges
Soak thick towels in hot water, wring them just enough so they’re damp, and press them against the ice surfaces. The soaked towel acts as a warm bridge delivering thermal energy into the ice layer. Replace towels as they cool.
5.3 Multi‑Stage Hot Water Refresh
If your containers cool quickly, plan to rotate them:
- Place several bowls of hot water in reserve.
- Cycle them in and out so steam remains robust.
- Always maintain steam pressure—don’t let the interior fall cool too soon.
5.4 Controlled Use of Hair Dryer or Heat Gun (With Extreme Care)
Some people use hair dryers set on low heat at a safe distance (6–12 inches or more), but this is risky due to electrical hazards and melting the plastic interior. If you attempt it:
- Keep the dryer outside the interior (never immersed in water or too close to surfaces).
- Move it continuously; don’t hold in one spot.
- Use low or warm settings—never full blast.
- Monitor for water drips—never allow water to touch the dryer or its plug.
Use only as a last resort and with extreme caution.
5.5 Air Recirculation Trick for Chest Freezers
In a chest freezer (top-opening), you can use a small fan inside to circulate warm ambient air. Place it to blow warm room air downwards over the ice layers. Combine with steaming bowls to increase efficacy.
5.6 Partial Door Opening Strategy
If the freezer door can be propped open slightly, you allow warm ambient air in while containing enough steam inside. This gives you a balance of warm airflow and internal condensation.
Click page 2 for more