This article is optimized naturally for high-value keywords like “home remedies for bleach stains,” “fabric stain removal,” “clothing care tips,” “effective stain removal,” “DIY cleaning solutions,” “fabric restoration techniques,” “laundry care,” “household cleaning hacks,” and others to help maximize visibility while keeping it entirely organic and without mentioning websites or references.
The 2 Powerful Techniques That You Can Apply at Home to Remove Bleach Stains
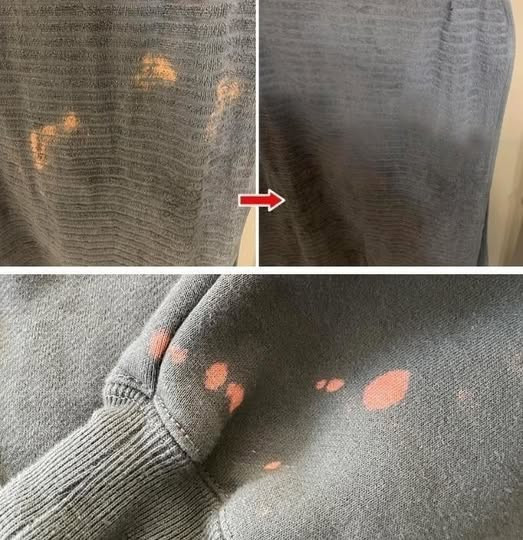
Bleach stains are one of the most frustrating mishaps in household cleaning and laundry care. Whether you accidentally spilled bleach on your favorite shirt or encountered an unexpected discoloration on upholstery or carpets, bleach stains can seem like a hopeless problem. The harsh chemical nature of bleach causes it to strip away color, leaving unsightly white or faded spots that traditional washing or scrubbing simply cannot fix.
Fortunately, you don’t have to throw out the stained clothing or furniture just yet. There are two highly effective, powerful techniques you can apply at home to tackle these bleach stains, restore your fabrics, and even prevent future damage. This comprehensive guide will walk you through the science behind bleach damage, why bleach stains behave the way they do, and the step-by-step methods to repair and minimize these stains using accessible household products.
Understanding Bleach Stains: Why They Happen and Why They’re Difficult to Remove
Before diving into the techniques, it’s essential to grasp what bleach does to fabrics and surfaces.
What Is Bleach and How Does It Work?
Bleach is a powerful oxidizing agent. The most common type found in homes is chlorine bleach, which contains sodium hypochlorite. Its primary function is to remove color and disinfect by breaking down the chemical bonds that give dyes their color.
When bleach comes into contact with colored fabric or dyed material, it breaks these bonds, effectively “bleaching” or decolorizing that area. This process is irreversible, which is why bleach stains appear as permanent white or lighter spots.
Why Are Bleach Stains So Tough?
Unlike typical stains such as coffee or ink, bleach does not add pigment or dirt; instead, it removes color. This makes traditional stain removers ineffective because they work by dissolving or lifting foreign substances, not restoring color.
The Two Powerful Home Techniques to Remove or Conceal Bleach Stains
While completely restoring color to a bleach stain is challenging, there are two highly effective methods to significantly reduce their visibility or even reverse the damage in some cases.
Technique 1: Dye Restoration Using Fabric Markers or Dye Kits
One of the most straightforward and accessible ways to repair bleach stains is by recoloring the affected area using fabric dye products.
Why Fabric Markers and Dyes Work
Fabric markers and dyes contain pigments designed specifically for textiles. They penetrate the fibers and bond with the fabric, restoring the lost color. Unlike bleach, which destroys color molecules, fabric markers add new color, effectively camouflaging the stain.
Step-By-Step Guide to Using Fabric Markers or Dye Kits
Step 1: Choose the Right Color
- Examine the original fabric color.
- Select a fabric marker or dye that closely matches your clothing or upholstery.
Step 2: Prepare the Stained Area
- Wash the fabric gently to remove any residue.
- Dry it completely to ensure even dye application.
Step 3: Test on a Small Hidden Area
- Before applying to the stain, test the dye on a concealed part of the fabric to check color match and any adverse reactions.
Step 4: Apply the Fabric Marker or Dye
- For fabric markers, color in the bleach stain carefully using light strokes.
- For dye kits, use a cotton swab or fine brush to apply dye precisely on the stain.
Step 5: Allow to Dry
- Let the treated area air dry for at least 24 hours.
- Avoid washing immediately to allow color to set.
Step 6: Seal the Color
- Use a fabric sealant spray or iron the area (following fabric instructions) to lock in the new color.
Tips for Best Results
- Work in a well-lit area.
- Apply multiple light layers rather than one thick layer to avoid uneven patches.
- Use fabric markers for small, localized stains; use dye kits for larger areas.
Technique 2: Creative Camouflage and Fabric Modification
Sometimes, restoring the exact original color is impossible. Instead, consider creative camouflage or fabric modification to make the bleach stain an intentional or less noticeable part of the garment or surface.
Approach A: Using Embroidery and Fabric Paint
- Embroidery: Cover the bleach stain with decorative stitching that complements the garment.
- Fabric Paint: Use fabric paint to create designs or patterns around or over the stain.
Step-By-Step Guide to Embroidery Camouflage
Step 1: Choose a Design
- Select a pattern or motif that fits the garment style (floral, geometric, abstract).
Step 2: Gather Materials
- Embroidery thread matching or contrasting with the fabric.
- Needle and embroidery hoop (optional but recommended).
Step 3: Prepare the Fabric
- Stretch the fabric taut in the hoop.
- Position the bleach stain centrally for the design.
Step 4: Embroider the Design
Click page 2 for more