A sparkling clean kitchen is every home chef’s dream, yet one often overlooked component that can make a huge difference is the oven hood filter. Over time, this essential kitchen element turns into a greasy, grimy mess that not only looks unpleasant but also impairs the hood’s performance, reduces air quality, and increases fire hazards. Whether you have a traditional range hood or a modern extractor fan, the filter plays a crucial role in capturing grease, smoke, and airborne particles during cooking. However, neglecting its maintenance leads to an accumulation of grease that becomes a stubborn nightmare to clean.
This comprehensive, detailed guide will show you how to effortlessly restore your oven hood filter to its original shine. Using simple homemade techniques and effective cleaning solutions, you can remove all the grease buildup and keep your kitchen safe, hygienic, and smelling fresh. We will explore various cleaning methods tailored to different types of filters, preventive tips, and detailed steps to save you time and effort. Say goodbye to that greasy mess, and hello to a cleaner, more efficient kitchen!
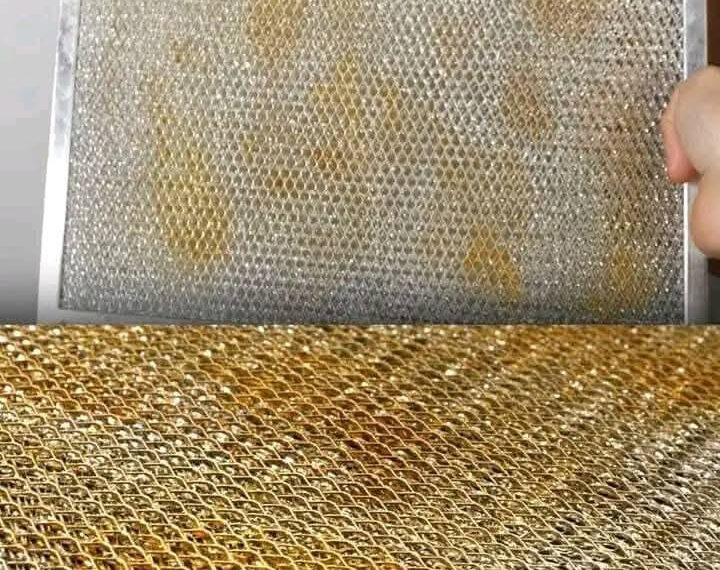
Why Your Oven Hood Filter Becomes a Greasy Mess
The Role of the Oven Hood Filter
The oven hood filter is designed to trap airborne grease, smoke, odors, and moisture generated during cooking. It prevents these particles from settling on kitchen surfaces and damaging your ventilation system. Most filters are made of metal mesh or charcoal and are installed directly under the hood’s fan.
How Grease Accumulates
Every time you cook, especially when frying, roasting, or grilling, tiny grease particles are released into the air. The hood’s filter captures these particles, but over days and weeks, the grease layers thicken and harden, creating a sticky, oily coating. This grease buildup can:
- Reduce Airflow: Clogged filters slow down ventilation, making your kitchen smoky and uncomfortable.
- Decrease Efficiency: The range hood requires more energy to work through the grease-clogged filter.
- Cause Odors: Trapped grease turns rancid, emitting unpleasant smells.
- Increase Fire Risk: Grease is highly flammable and can cause kitchen fires if not cleaned regularly.
- Attract Pests: The greasy residue can attract insects and rodents.
Identifying When Your Oven Hood Filter Needs Cleaning
- Visible layers of grease and grime on the filter surface.
- Reduced suction power from the range hood.
- Lingering food odors in the kitchen.
- Unusual noises from the hood fan caused by clogged filters.
- Noticeable smoke accumulation during cooking.
Types of Oven Hood Filters and Cleaning Considerations
Before diving into cleaning methods, it’s crucial to identify your filter type as this affects cleaning techniques.
1. Aluminum Mesh Filters
- Common in many kitchens.
- Thin layers of mesh trap grease effectively.
- Can be removed easily for cleaning.
- Should not be soaked in water for too long to prevent corrosion.
2. Charcoal Filters
- Used in ductless range hoods.
- Absorb odors rather than trap grease.
- Generally non-washable and require replacement every 6-12 months.
3. Stainless Steel Filters
- Durable and more resistant to corrosion.
- Can handle harsher cleaning but still require care to maintain shine.
Step-by-Step Homemade Cleaning Methods for Greasy Oven Hood Filters
Method 1: The Baking Soda and Dish Soap Soak — Powerful Degreasing Combo
Why It Works: Baking soda breaks down grease and deodorizes, while dish soap dissolves oily residues.
Supplies Needed:
- Large basin or sink
- Hot water
- 1/4 cup baking soda
- A few drops of liquid dish soap
- Soft brush or sponge
- Microfiber cloth
Instructions:
- Prepare Soaking Solution: Fill the basin with very hot water (as hot as you can safely handle). Add the baking soda and dish soap, stirring to dissolve.
- Remove Filter: Take out the greasy filter carefully from the hood.
- Soak Filter: Submerge the filter in the solution, ensuring it’s fully covered. Let it soak for 30-60 minutes depending on grease severity.
- Scrub the Filter: Use a soft brush or sponge to gently scrub away loosened grease, focusing on stubborn patches. Avoid abrasive tools to protect the filter’s surface.
- Rinse Thoroughly: Rinse with hot water to remove residue.
- Dry Completely: Shake off excess water and dry with a microfiber cloth or allow to air dry before reinstalling.
Method 2: Vinegar and Baking Soda Spray — Natural Fizzing Power
Why It Works: Vinegar’s acidity cuts through grease, while baking soda provides mild abrasion and deodorization.
Supplies Needed:
- Spray bottle
- White vinegar
- Baking soda
- Warm water
- Soft brush
Instructions:
- Mix the Spray: Combine one part white vinegar with two parts warm water in a spray bottle.
- Apply Baking Soda: Sprinkle baking soda directly on the greasy filter or on a damp sponge.
- Spray Vinegar Solution: Spray the vinegar solution over the baking soda on the filter. The mixture will fizz, helping to break down grease.
- Let Sit: Allow the fizzing action to work for 10-15 minutes.
- Scrub Gently: Using a soft brush, scrub the grease buildup.
- Rinse and Dry: Rinse thoroughly with warm water and dry before reassembling.
Method 3: Lemon Juice and Salt Scrub — Fresh and Effective
Why It Works: Lemon juice’s citric acid dissolves grease and salt acts as an abrasive to scrub grime.
Supplies Needed:
- Lemon
- Coarse salt
- Sponge or cloth
- Warm water
Instructions:
- Cut Lemon: Slice a lemon in half.
- Apply Salt: Sprinkle salt generously over the cut side of the lemon.
- Scrub Filter: Use the lemon half as a scrubber, applying salt as needed to scour the filter’s greasy surface.
- Let Lemon Juice Sit: Allow lemon juice to sit on the filter for 10 minutes.
- Rinse and Dry: Rinse with warm water and wipe dry.
Method 4: Commercial Degreaser Alternatives
Click page 2 for more