Introduction
Faucets are among the most visible fixtures in your home. Over time, they accumulate mineral deposits, scale, limescale, water spots, and grime—making them look dull, impairing water flow, or even causing drips and blockages. The good news is that with the right technique and tools, you can restore a faucet’s sparkle fairly quickly and without resorting to harsh chemicals. This article will guide you step by step through diagnosing, cleaning, descaling, finishing, and preserving your faucets so they stay pristine for longer.
You’ll learn:
- What scale and limescale really are (and why they appear)
- How to diagnose the severity of buildup
- Tools and materials you need (many likely already in your home)
- Step‑by‑step methods (fast, deeper, and preventive)
- Special considerations (delicate finishes, aerators, hidden parts)
- Expert-level tips, shortcuts, and tricks
- Maintenance and prevention strategies
By following this guide, you should be able to transform a dull, crusty faucet into one that looks nearly new—and maintain that appearance over time.
Understanding Scale & Limescale: The Enemy You Can See
What is limescale?
- Limescale (aka “lime scale” or “scale”) is a hard, chalky deposit that forms when water with dissolved minerals—mostly calcium and magnesium—evaporates and leaves those minerals behind.
- Chemically, it’s a deposit of calcium carbonate or related compounds. This is especially common in regions with hard water.
- The more mineral content in your water supply, the faster and more severe the scale buildup will be.
Why is it a problem?
- Cosmetic blemishes
The white, chalky, rough patches ruin the shiny metallic looks of faucets, especially chrome, stainless steel, or polished finishes. - Reduced water flow & spray distortion
Scale clogs the aerator (the screen at the tip of the faucet) and internal passages, causing reduced pressure and irregular spray patterns. - Corrosion and damage over time
Thick scale can trap moisture, encourage micro‑rust formation, degrade seals, or erode finishes. - Costly maintenance & replacement
If neglected, you might need to replace parts or entire faucet units to restore function. - Bacterial harborage (in extreme cases)
Because scale is porous and rough, it can accumulate grime or biofilm, so cleaning it regularly also helps hygiene.
Given these downsides, removing scale not only restores looks but improves performance and extends the life of your faucet.
Diagnosing the Buildup: How Bad Is It?
Before diving in, it helps to assess the severity and type of deposit. Not all scale is the same, and not all parts of a faucet are equally affected.
Common visual and tactile clues
- White or gray crusty patches around the spout base, joints, and edges
- Rough or gritty feeling when you rub with a fingertip
- Dull, cloudy finish instead of mirror shine
- Slow drip, sputtering stream, or spray splitting
- Darker discoloration (green or rusty hues) mixed with scale might indicate corrosion or mixed mineral/iron deposits
Where scale tends to accumulate most
- Spout tip / aerator – the final outlet of water, often exposed to air and evaporation
- Joints and crevices – corners, threads, seams, and base rings
- Handles and base – at the points where moisture and soap collects
- Internal passages – harder to see but critical for water flow
- Underneath or hidden areas – backs, undersides, or inside walls of faucet housings
If the buildup is thin and mostly superficial, a light soak or wrap approach can often handle it in minutes. But if it’s thick and caked, you may need to dismantle parts or apply stronger solutions (cautiously) with a more extended soak.
Tools, Materials and Safety
Before starting, gather what you’ll need. Many items are already in your household.
Tools & cleaning aids
- Soft microfiber cloths or lint‑free cotton rags
- Soft sponges (non‑scratch)
- Old toothbrush (soft or medium bristles)
- Pipe wrench or pliers (with cloth wrap to protect finish)
- Cotton swabs or toothpicks
- Rubber bands or twist ties
- Small plastic bags (zip or sandwich bags)
- Bucket or basin
- Gloves (rubber or nitrile)
- Safety goggles (if using stronger acids)
Cleaning agents / solutions
You can choose natural or commercial options depending on severity:
- White distilled vinegar (acetic acid)
- Lemon juice (citric acid)
- Baking soda (sodium bicarbonate)
- Mild citric acid powder
- Commercial descaling or limescale removers (for tougher jobs)
- Diluted acid cleaners (if safe for your faucet)
Precautions & safety notes
- Always test any cleaner on a small, inconspicuous spot first
- Do not use abrasive pads, steel wool, or harsh scrubbers—these can scratch and damage finishes
- Avoid acids that are too strong (hydrochloric, muriatic, strong phosphoric blends) unless the faucet material tolerates them
- Do not spray concentrated cleaners directly on the faucet—apply through cloths to avoid splash into plumbing or seals
- Work in a well‑ventilated area
- Always rinse thoroughly after using acidic or chemical cleaners
- Wear gloves and eye protection if handling stronger chemicals
With preparation and caution, you can keep your faucet safe while restoring it.
Basic Quick Soak Method (Ideal for Light Buildup)
This is a go-to method when you see mild scaling and want a fast, effective fix in perhaps 15–30 minutes.
Step 1: Turn off water (if possible) & protect surrounding area
- If your faucet allows, turn off the valve under the sink to isolate it.
- Place towels or cloths below to catch any drips or residue.
- Wipe the faucet first to remove loose dust or debris.
Step 2: Prepare a mild acidic soak
- Mix equal parts vinegar and water (1:1) in a cup or container.
- Alternatively, use lemon juice diluted with water (e.g., half lemon juice, half water).
Step 3: Soak the affected parts
Option A: Wrap with soaked cloth / paper towel
- Soak a cloth or paper towel fully in the vinegar solution, then wrap it around the faucet spout, handle base, or other scale spots.
- Use rubber bands or ties to hold it in place so it doesn’t slip.
- Let it remain in contact for at least 15–30 minutes. For tougher spots, up to an hour is acceptable.
Option B: Bag soak method
- Fill a small plastic bag (zip or sandwich bag) with the vinegar solution.
- Slide the bag so that the spout tip or parts with scale are submerged inside.
- Secure with a rubber band or twist tie.
- Let it sit for 15–30 minutes (or longer for stubborn scale).
Step 4: Scrub gently
- Remove the wrap or bag.
- Use a soft toothbrush to scrub the loosened scale. Focus on crevices, joints, edges, and the aerator tip.
- Use a toothpick or cotton swab to clean inside small holes gently.
- If scale remains, reapply or repeat briefly.
Step 5: Rinse thoroughly and polish
- Flush water through the faucet for a minute or two to remove residual acid and loosened scale bits.
- Wipe down all surfaces with a clean, damp cloth.
- Dry and buff with a soft, dry cloth to restore shine.
In many cases, this simple soak + scrub will remove light limescale, restore shine, and restore flow quickly and safely.
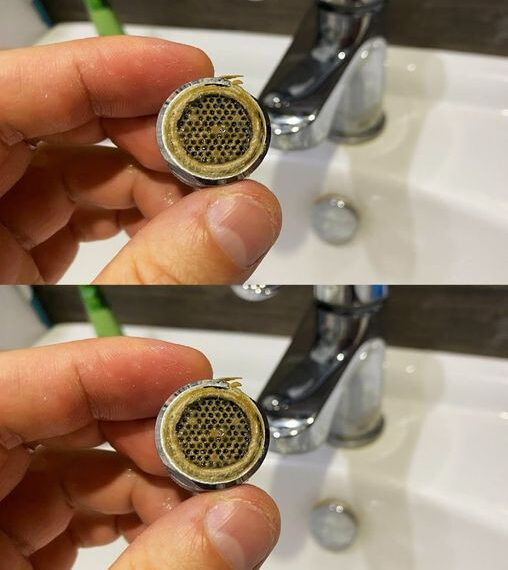
Removing & Cleaning the Aerator (For Deeper Descaling)
Often, the faucet aerator (the little screen at the tip) is the worst culprit for reduced flow. Descaling the aerator separately can yield dramatic improvements in water pressure and clarity.
Step A: Remove the aerator
- Use your fingers, or wrap the tip with cloth for grip.
- Turn counterclockwise to unscrew it. If it’s tight, use pliers with a cloth wrapped to protect finish.
- Once loose, carefully take it off.
Step B: Disassemble (if possible)
Many aerators come in 2–3 parts (screen/filter, nut, gasket). Separate these gently.
Step C: Soak parts
- Place the aerator parts into a small bowl or container with vinegar or citric acid solution.
- Leave for 15–30 minutes (or up to an hour for heavy buildup).
- The acid will dissolve mineral deposits.
Step D: Scrub & flush
- Use a toothbrush or fine brush to scrub remaining deposits.
- Use running water to flush through the screen(s) and openings.
- Use a soft needle or toothpick to clear individual holes if necessary.
Step E: Reassemble and reattach
- Dry the parts.
- Put the aerator pieces back together.
- Screw it back onto the faucet, making sure it’s snug but not overtightened.
After this, the water flow should be stronger and more uniform.
Dealing with Stubborn or Thick Scale
If scale is extensive, crusted, layered, or long-neglected, you’ll need stronger methods and more patience. Here’s how to tackle the more challenging cases.
Method 1: Prolonged soak / overnight soak
- Use a stronger concentration of acid (e.g., undiluted vinegar or commercial descaler) in a bag or wrap.
- Leave it overnight (8–12 hours). For materials that tolerate it, this extended contact time helps dissolve deeper deposits.
- In the morning, scrub and rinse.
Method 2: Baking soda + acid (foaming paste method)
- Create a paste of baking soda and a small amount of water (thicker than a slurry).
- Apply this paste on top of scale deposits.
- Then apply vinegar or another acid over the paste (the acid will react with the baking soda and generate effervescence, helping lift deposits).
- Let it foam and work for 10–20 minutes.
- Use a toothbrush to scrub, then rinse thoroughly.
This method is helpful for combining mechanical loosening (foam action) with chemical action.
Method 3: Commercial limescale remover (cautious use)
If natural methods don’t suffice:
- Use a commercial descaling or limescale remover labeled safe for faucets.
- Dilute if necessary, and always test on a small area first.
- Soak only parts, or apply by cloth—do not flood the entire fixture.
- Follow manufacturer’s contact time strictly (often 5–15 minutes).
- Rinse multiple times to ensure no residue remains.
Method 4: Mechanical removal (last resort, with care)
- If scale is extremely thick, you may need to gently chip or scrape parts with a plastic or nylon scraper—but never metal or sharp edges on delicate finishes.
- Use a toothbrush or small brush to work loosened bits.
- After mechanical removal, always do a mild acid rinse to neutralize residues.
Be extra cautious near finishes (chrome, plating, brushed surfaces)—you don’t want to scratch or dull them.
Special Considerations: Finishes, Material Types, and Complex Faucets
Faucet materials & finishes
- Chrome, nickel plating: generally tolerant of light acid cleaning, but avoid strong chemicals, scratching, or aggressive scrubbers.
- Brass, bronze, copper: be more gentle—acid is riskier. Use diluted or buffered solutions.
- Stainless steel: resilient, but avoid chlorine or bleach-based cleansers which may cause pitting.
- Matte, satin, painted or specialty finishes: use extra caution. Always test in inconspicuous spots and use mild acid solutions.
Handling complex faucet designs
Click page 2 for more