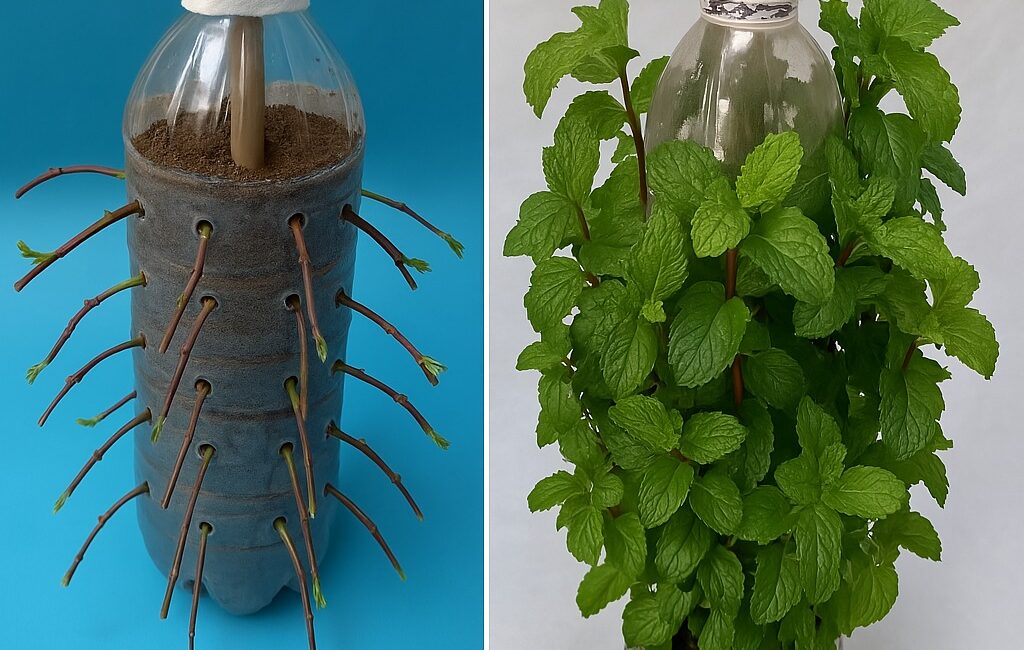
Mint is one of the most beloved herbs worldwide, cherished for its refreshing aroma and versatile use in teas, cooking, cocktails, and natural remedies. Its vigorous growth and hardy nature make it an excellent choice for gardeners, whether beginner or expert. Yet, mint can be invasive if planted directly in garden soil, and growing it indoors or in small spaces can sometimes be tricky.
What if you could grow mint all year round with minimal space, effort, and cost? And what if the secret was as simple as reusing an everyday item like a plastic bottle? This guide will walk you through an ingenious, eco-friendly method to cultivate thriving mint plants indoors or outdoors, using recycled plastic bottles as self-watering planters. Not only does this conserve resources, but it also provides a sustainable, easy-care solution that keeps your mint lush and ready for harvest whenever you want.
Why Grow Mint Using Plastic Bottles?
The Many Benefits of This Method
Using plastic bottles to grow mint is much more than a creative recycling project — it’s a highly practical gardening technique. Here are several compelling reasons why this method stands out:
- Water Efficiency
Plastic bottle planters can be turned into self-watering systems that retain moisture effectively, ensuring your mint gets a steady water supply without frequent watering. This prevents water wastage and keeps the plant healthy. - Space-Saving and Portable
If you live in a small apartment, have limited balcony space, or want to grow mint indoors, these vertical, compact planters fit perfectly. You can even hang them or stack several to create a vertical herb garden. - Cost-Effective and Sustainable
Rather than buying expensive pots or planters, you reuse plastic bottles — an abundant waste product — reducing environmental impact and saving money. - Improved Plant Health
Self-watering bottles reduce the risk of root rot and fungal diseases caused by overwatering. The moisture wick system delivers just the right amount of water to the roots. - Easy to Monitor and Maintain
Transparent plastic lets you see the soil moisture levels and root growth, helping you know when to water or repot. - Mobility and Sunlight Optimization
Plastic bottle planters are lightweight and easy to move. You can quickly change your mint’s location to optimize sunlight exposure or protect it from harsh weather.
What You’ll Need to Get Started
Before you begin your mint-growing journey, gather the following materials:
- Plastic bottles: Ideally 2-liter soda bottles or larger; clear bottles work best for monitoring moisture.
- Sharp scissors or a utility knife: To cut and shape the bottles safely.
- A drill, nail, or sharp tool: For creating drainage holes and wick holes.
- Cotton wick or thick cotton string: To serve as a moisture wick in self-watering systems.
- Potting soil: Choose a high-quality, organic potting mix rich in nutrients and well-draining.
- Mint cuttings or seeds: Cuttings are faster to root and produce mature plants sooner.
- Water: Clean tap water or rainwater.
- Compost or organic fertilizer: Optional but recommended for nutrient boost.
- A small container or tray: To place under the planter if you’re not making a self-watering system.
Step-by-Step Guide to Growing Mint in Plastic Bottles
Step 1: Prepare the Plastic Bottle
- Clean the bottle thoroughly. Remove labels and wash with warm, soapy water to eliminate residues.
- Cut the bottle into two parts. Use scissors or a utility knife to carefully slice the bottle approximately one-third from the top. The larger bottom section will hold the soil and plant. The top section will be used for the watering reservoir if making a self-watering planter.
- Create drainage holes. Using a drill or nail, poke several small holes in the bottom of the lower half. This prevents waterlogging and helps excess water drain away.
- Prepare the bottle cap. For a self-watering setup, pierce a small hole in the bottle cap. Thread a cotton wick through this hole so that it reaches the water reservoir below.
Step 2: Prepare the Soil and Plant
- Mix the potting soil with some compost or organic matter to provide nutrients.
- Moisten the soil slightly before planting — it should be damp but not soaking wet.
- Root mint cuttings first. Place mint cuttings with removed lower leaves in a glass of water until roots appear (usually 7–10 days). Alternatively, plant seeds about ¼ inch deep in the soil.
Step 3: Assemble the Planter
- If using a self-watering system:
- Fill the bottom half of the bottle with water (about halfway).
- Insert the wick through the bottle cap so it hangs into the water reservoir below.
- Place the top half (with soil and mint) upside down inside the bottom half. The wick should reach into the soil, delivering moisture as needed.
- If not using self-watering:
- Simply fill the bottom half with soil, plant the mint, and water regularly.
Step 4: Position Your Mint Planter
- Choose a spot that receives 4 to 6 hours of indirect sunlight daily.
- Avoid harsh midday sun that could dry the soil too quickly.
- Indoors, a windowsill or bright corner works well.
Caring for Your Mint Plant in a Plastic Bottle
Watering
- Keep the soil consistently moist but not soggy.
- In a self-watering system, check water levels in the reservoir weekly and refill as needed.
- If watering manually, water deeply once the top inch of soil feels dry.
- Mist leaves occasionally to boost humidity, especially indoors.
Click page 2 for more


