Coconut and chocolate have been a classic culinary pairing for decades, and for good reason. The creamy, tropical flavor of coconut blends beautifully with the rich sweetness of chocolate, creating a treat that is both indulgent and satisfying. Among the many desserts inspired by this combination, homemade Coconut Chocolate Balls, often referred to as “Bounty-style” treats, stand out for their simplicity, versatility, and sheer deliciousness. Whether you are a seasoned baker or a beginner in the kitchen, this guide will provide everything you need to know to create these delectable confections from scratch.
This article will not only give you a step-by-step recipe but also dive into tips for perfect texture, flavor variations, storage advice, and even the science behind why coconut and chocolate complement each other so well.
Ingredients for Homemade Coconut Chocolate Balls
The beauty of this recipe lies in its simplicity. You only need three main ingredients to create a dessert that tastes like it came from a professional chocolatier:
- 200 grams of shredded coconut
Shredded coconut forms the base of these treats. It provides a chewy, tropical texture that pairs perfectly with creamy chocolate. Freshly shredded coconut can be used if available, but dried shredded coconut works just as well. The key is to ensure it is finely shredded for the best consistency. - 150 grams of sweetened condensed milk
Sweetened condensed milk acts as both a binder and a sweetener. It gives the coconut mixture a smooth, malleable texture that allows you to form perfect balls without them crumbling. It also adds a rich sweetness that balances the natural nuttiness of coconut. - 200 grams of chocolate
You can choose milk chocolate, dark chocolate, or even a mix depending on your taste preferences. Milk chocolate provides a creamy, sweet coating, while dark chocolate adds a slightly bitter contrast that highlights the coconut’s flavor. Using high-quality chocolate ensures a smooth finish and satisfying taste.
Step-by-Step Preparation Guide
Creating these homemade Bounty-style coconut balls is straightforward but requires attention to detail for perfect results.
Step 1: Prepare the Coconut Mixture
Begin by placing the shredded coconut in a large mixing bowl. Pour in the sweetened condensed milk and mix thoroughly using a spatula or your hands. The goal is to achieve a uniform, sticky paste where every coconut shred is coated with milk.
Tips for Success:
- If the mixture feels too dry, add a teaspoon of condensed milk at a time until it holds together.
- Avoid adding too much, as overly wet coconut can make the balls difficult to shape and may cause the chocolate coating to slide off.
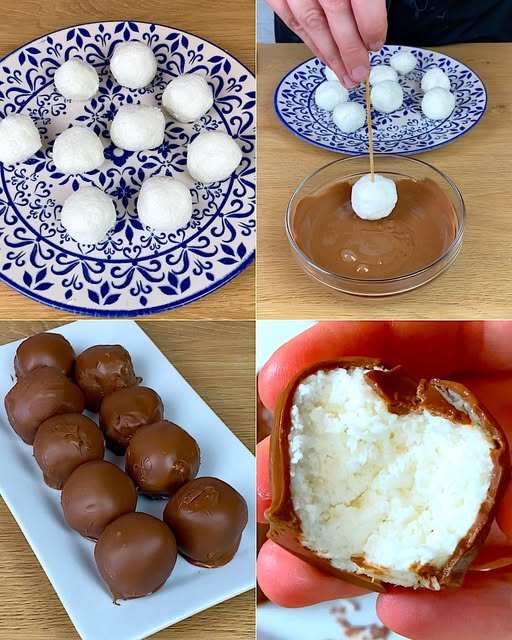
Step 2: Shape the Coconut Balls
Once your mixture is well combined, it’s time to form the balls. Using your hands, scoop small portions of the mixture and roll them into smooth spheres. The ideal size is about 2–3 centimeters in diameter, but you can adjust according to your preference.
Pro Tips:
- Wetting your hands slightly with water or lightly oiling them can prevent sticking.
- For a unique variation, you can shape the mixture into small cylinders for a more authentic Bounty-bar look.
After shaping, place the coconut balls on a tray lined with parchment paper and transfer them to the freezer for 20–30 minutes. Chilling them ensures that the balls are firm enough to dip in chocolate without losing shape.
Step 3: Melt the Chocolate
While the balls are chilling, prepare the chocolate coating. Chocolate can be melted using a double boiler (bain-marie) or in a microwave.
For a double boiler:
- Fill a saucepan with about 2–3 centimeters of water and bring it to a simmer.
- Place a heatproof bowl on top, ensuring it doesn’t touch the water.
- Add the chocolate and stir constantly until smooth.
For a microwave:
- Chop the chocolate into small pieces and place them in a microwave-safe bowl.
- Heat at 30-second intervals, stirring in between, until fully melted.
Pro Tips:
- Avoid overheating chocolate; it can seize and become grainy.
- Adding a teaspoon of coconut oil can give the chocolate a glossy finish and make it easier to coat the balls.
Step 4: Dip the Coconut Balls
Once the chocolate is melted and smooth, remove the coconut balls from the freezer. Using a toothpick or skewer, pierce a ball and dip it into the chocolate, ensuring it is fully coated. Gently shake off any excess chocolate before placing the ball back on the parchment-lined tray.
Tips for Perfect Coating:
- Work quickly before the chocolate begins to harden.
- If desired, you can sprinkle additional shredded coconut on top of the chocolate before it sets for an extra decorative touch.
Step 5: Chill and Set
After dipping all the coconut balls, transfer them to the refrigerator for at least 30 minutes to allow the chocolate to harden completely. This step is crucial for achieving a satisfying snap when bitten into.
Tips for Perfect Coconut Chocolate Balls
While the recipe is simple, small adjustments can make a big difference in texture, flavor, and appearance:
- Texture Adjustments:
- For extra chewy balls, use coarsely shredded coconut.
- For smoother, more uniform balls, pulse dried coconut in a food processor before mixing.
- Flavor Variations:
- Add a teaspoon of vanilla extract for a richer flavor.
- Incorporate a tablespoon of rum or coconut liqueur for an adult-friendly twist.
- Mix in finely chopped nuts, dried fruits, or chocolate chips for added texture.
- Chocolate Options:
- White chocolate provides a sweeter, creamy contrast to coconut.
- Dark chocolate with at least 70% cocoa adds a slightly bitter edge for sophisticated palates.
- Presentation Ideas:
- Dust with cocoa powder or powdered sugar for a professional look.
- Place each ball in mini paper cups for individual servings.
Storage and Shelf Life
Click page 2 for more