Growing your own vegetables is one of the most rewarding and sustainable ways to nourish your family. But let’s be honest: watering plants regularly—especially during busy days, vacations, or hot summers—can be a hassle. What if you could build a simple, effective automatic watering system for your vegetable garden that costs almost nothing and uses materials you already have at home?
This guide will walk you through the step-by-step process of creating an automatic vegetable waterer using a plastic bottle. You’ll learn everything from why this DIY system is useful, how it works, the materials needed, easy assembly instructions, installation tips, maintenance advice, and how to customize it for different plants and garden sizes.
Whether you are an urban gardener with container plants or have a large backyard plot, this technique will save you time, conserve water, and keep your vegetables thriving even when you’re away.
Table of Contents
- Why You Need an Automatic Vegetable Waterer
- How Does a Plastic Bottle Waterer Work?
- What You’ll Need: Materials & Tools
- Preparing Your Plastic Bottle
- Step-by-Step Instructions to Build Your Automatic Waterer
- Installing the Waterer in Your Vegetable Garden
- Adjusting Water Flow and Frequency
- Maintaining Your Watering System
- Tips for Optimizing Your Vegetable Growth
- Variations and Customizations for Different Garden Types
- Common Problems and How to Fix Them
- Eco-Friendly Benefits of This DIY System
- Final Thoughts: Save Water, Time, and Grow Better Veggies!
1. Why You Need an Automatic Vegetable Waterer
Watering your vegetable garden regularly is essential for healthy plant growth. However, many gardeners face these challenges:
- Forgetting to water due to busy schedules
- Overwatering or underwatering plants
- Wasting water by manual watering that isn’t targeted
- Leaving plants dry during vacations or trips
- Needing a sustainable, low-cost solution that’s easy to set up
An automatic vegetable waterer made from a plastic bottle is a clever answer to these problems. It delivers consistent moisture directly to the soil at the plant’s roots. This ensures optimal hydration without excess water runoff or evaporation, saving both water and your precious time.
2. How Does a Plastic Bottle Waterer Work?
This system operates on a simple principle: slow, controlled water release by gravity and capillary action.
- A plastic bottle filled with water acts as a reservoir.
- When placed upside down into the soil, small holes or openings allow water to slowly seep out.
- As the soil dries, it “pulls” water from the bottle through the holes, keeping the soil moist without flooding.
- The system works continuously and automatically until the bottle empties.
This slow drip mechanism mimics natural watering and reduces water stress on plants. It’s especially useful for vegetable plants with shallow root zones that need regular moisture.
3. What You’ll Need: Materials & Tools
Before starting, gather these inexpensive and commonly available materials and tools:
Materials
- One or more empty plastic bottles (1-liter or 2-liter soda bottles work well)
- Clean water (tap water or rainwater)
- Optional: String or twine (to secure the bottle)
- Optional: Small stones or pebbles (to anchor the bottle in soil)
Tools
- Sharp utility knife or scissors
- Needle or thumbtack (for making small holes)
- Drill with small drill bits (optional, for more precise holes)
- Marker (to mark hole locations)
- Gloves (optional, for protection when cutting)
4. Preparing Your Plastic Bottle
Start by preparing the plastic bottle properly for its watering role.
Step 1: Clean the bottle
- Wash the bottle thoroughly to remove any residue.
- Rinse with water and let dry.
Step 2: Remove the label (optional)
- Peel off the label for easier monitoring of water levels.
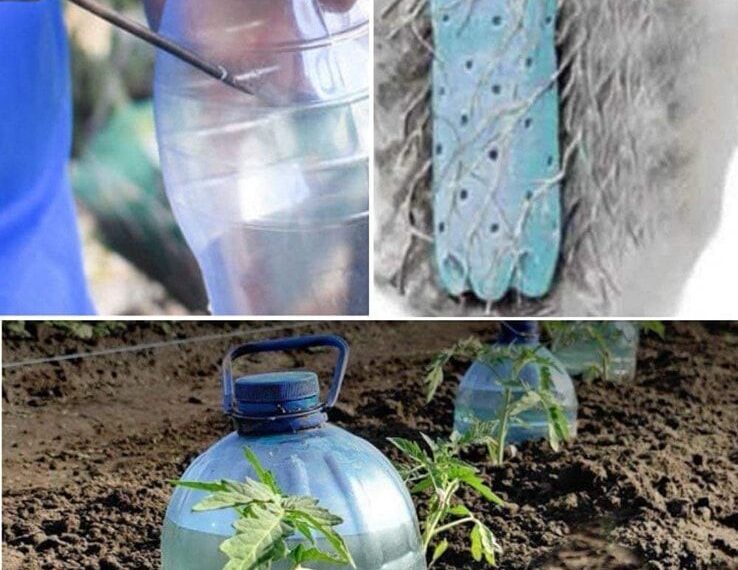
Step 3: Make holes in the bottle cap
- Use a needle or thumbtack to poke 3-5 tiny holes evenly spaced on the bottle cap.
- These holes control the water flow rate.
- Make holes small to allow slow dripping. You can adjust hole size later if needed.
Step 4: Make air holes in the bottle body
- To avoid vacuum lock (which stops water flow), create a small air hole on the side near the top of the bottle (which will be inserted into soil).
- Use a needle or drill to make a tiny hole (~1 mm diameter).
- This hole allows air to enter as water leaves, maintaining flow.
Step 5: Optional holes in the bottle body
- For faster water release, you can poke a few small holes near the bottle’s neck.
- Be careful; too many holes or too large holes will cause the bottle to empty quickly.
5. Step-by-Step Instructions to Build Your Automatic Waterer
Now, let’s build the waterer.
Step 1: Fill the bottle with water
- Fill the bottle with clean water up to the neck.
Step 2: Screw the cap back on tightly
- Ensure cap with holes is securely fastened to prevent leaks except through the holes.
Step 3: Invert the bottle
- Turn the bottle upside down (cap down).
Step 4: Insert into soil near vegetable plant roots
- Dig a hole in the soil slightly wider than the bottle neck.
- Push the bottle neck deep into the soil near the plant’s base, so that the cap and holes are covered by soil.
- The bottle body should stick out above the soil for easy refilling.
Step 5: Stabilize the bottle
- Use small stones or soil to support the bottle if it leans.
- You can tie a string around the bottle neck and secure it to a stake for extra stability.
6. Installing the Waterer in Your Vegetable Garden
clique sur page 2 pour suivre