The oven. A kitchen essential that we all rely on for cooking up delicious meals. However, one thing we all dread when using the oven is the inevitable mess it leaves behind. Whether it’s splatters from baking lasagna, grease from roasting chicken, or stubborn food stains from cooking a homemade pizza, ovens tend to accumulate grime and grease over time. And the worst part? Cleaning it!
For many, oven cleaning is a tedious task. Scrubbing away at grease-filled racks, scraping off dried food, and dealing with harsh cleaning chemicals that often smell more toxic than effective. It’s not only time-consuming but also physically exhausting. We’ve all been there — a dirty oven with no easy way to tackle it. But here’s the good news: you don’t have to scrub your oven like that anymore. Thanks to a simple trick I learned from a friend, cleaning my oven has now become a breeze, and my oven looks like new with little effort. Let me walk you through how this revolutionary technique works and how you can use it to save time and energy.
The Dreaded Task of Oven Cleaning
Oven cleaning has long been one of the most hated chores in the kitchen. Many of us have gone to great lengths to keep the oven clean, but even with regular maintenance, grease and grime build up eventually. This is especially true for those who do a lot of cooking, such as roasting meats or baking high-fat dishes. The grease splatters, food spills, and spills from overflows or boiling liquids can create sticky messes that are hard to remove.
Why Does Oven Cleaning Suck So Much?
There are several reasons why oven cleaning is such a painful task:
- Baked-on Grease and Stains: Grease can stick to the surfaces of the oven and become nearly impossible to clean, especially when it hardens. It can take multiple rounds of scrubbing to get rid of, leaving your hands sore and your patience wearing thin.
- Hard-to-Reach Areas: Ovens often have areas that are tricky to get to, such as the bottom, behind the racks, or around the heating elements. Reaching into those spaces requires contorting your body into awkward positions or using long brushes that don’t always work well.
- Harsh Chemicals: Many oven cleaning products on the market contain harsh chemicals that are not only bad for the environment but can also leave an unpleasant smell in your kitchen. Moreover, they often require you to leave the product to sit for hours, causing frustration if you’re short on time.
- Time-Consuming: The process of manually scrubbing a dirty oven can take hours. Even after applying a cleaner, you might need to repeat the process several times to get your oven sparkling clean.
Given all these challenges, it’s no wonder so many people avoid oven cleaning as long as possible — until the grease becomes unbearable or the oven stops functioning properly.
The Secret I Learned from a Friend: A Game-Changer for Oven Cleaning
After years of struggling with greasy ovens and spending hours cleaning them, I was finally shown a cleaning hack by a friend that changed everything. This secret trick is not only effective but also effortless. The best part? It doesn’t require toxic chemicals, hours of scrubbing, or any special tools. It’s a game-changer that has completely revolutionized how I clean my oven.
Let me walk you through the process that will save you time, energy, and frustration.
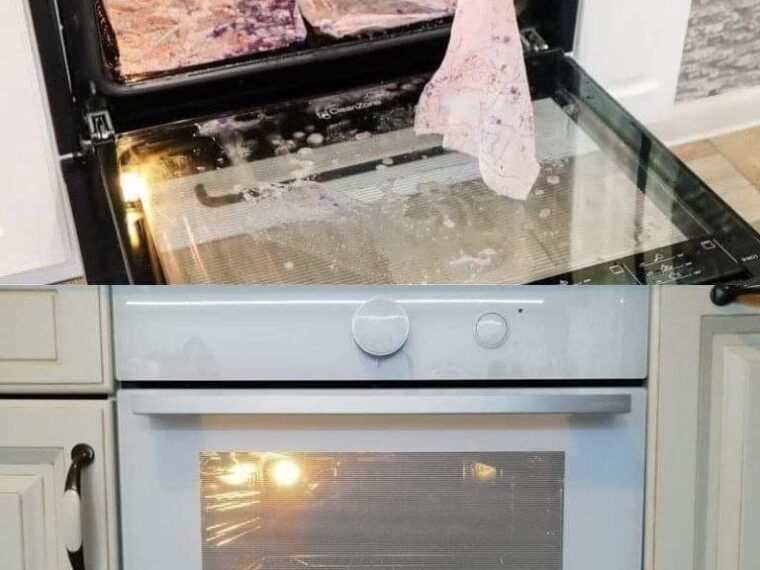
The Simple Trick That Will Make Your Oven Look Brand New
What You Need:
Before diving into the method, let’s take a look at what you’ll need to make your oven shine:
- Baking Soda: The star of this trick. Baking soda is an all-natural cleaning agent that’s abrasive enough to scrub away grease and grime without damaging your oven’s surfaces. It’s non-toxic, environmentally friendly, and can be found in almost every household.
- White Vinegar: White vinegar works wonders as a natural cleaner. When combined with baking soda, it creates a fizzing reaction that helps break down tough stains, grease, and grime in the oven.
- Water: To create the paste and mix with the vinegar, you’ll need some water, which is the perfect base for this simple cleaning solution.
- A Spray Bottle: This is used to apply the vinegar to the surfaces of your oven and enhance the cleaning process.
- A Damp Cloth: For wiping off the residue once the cleaning is done.
The Step-By-Step Process
Step 1: Make a Baking Soda Paste
Start by creating the magic cleaning paste. In a small bowl, mix ½ cup of baking soda with a few tablespoons of water to form a thick paste. You want the consistency to be spreadable but not too runny.
Step 2: Apply the Paste to the Oven
Now, apply this paste all over the interior of the oven — especially where there are grease spots, stains, or food debris. Use your hands or a spatula to spread the paste over the oven surfaces, including the walls, ceiling, and floor. Focus on areas that have the most buildup.
Make sure to avoid the heating elements. You can also apply a thin layer of paste to the oven racks for easy cleaning.
Step 3: Let the Paste Sit
After applying the paste, let it sit for at least 30 minutes to allow the baking soda to work its magic. For tougher stains, you can leave the paste on for a few hours or even overnight. During this time, the baking soda will break down grease, stains, and food residue, making it easier to wipe away.
Step 4: Spray White Vinegar Over the Paste
After the paste has had time to sit, grab a spray bottle and fill it with white vinegar. Lightly spray the vinegar over the baking soda paste. When the vinegar comes into contact with the baking soda, it will start to fizz and bubble, creating a reaction that helps lift stubborn grease and grime.
You’ll notice the paste foaming up, which is a good sign! This fizzing reaction helps to break down the tough food stains and grease inside your oven.
Step 5: Wipe It All Away
After the vinegar and baking soda have fizzed and worked their magic for about 10 minutes, use a damp cloth to wipe away the paste. You’ll be amazed at how easily the grime comes off — it’s like the oven cleans itself! For any remaining paste or spots, use a sponge or a soft scrub brush to gently scrub them away.
Wipe the surfaces down with a clean, damp cloth to remove any leftover residue. If you find that some areas need a little extra attention, simply repeat the process or use a bit more vinegar and baking soda paste on those stubborn spots.
Step 6: Clean the Racks (Optional)
If you haven’t already cleaned the oven racks, now’s the time to tackle them. If the racks are really greasy, soak them in warm water mixed with some baking soda or dish soap. After soaking for an hour or so, scrub them with a sponge or brush, and you’ll be left with sparkling clean oven racks.
Why This Trick Is So Effective
You may be wondering why this method is so much more effective than traditional scrubbing with harsh chemical cleaners. Here are the reasons why this trick works wonders:
click page 2 to continue