Growing pineapples at home is a rewarding, surprisingly simple project that can add tropical charm to your indoor garden. While pineapples (Ananas comosus) are usually associated with tropical climates, they can thrive in a home environment when propagated correctly. One of the easiest and most beginner-friendly methods of growing pineapple is propagating it in water—no soil required initially. Whether you’re an urban gardener, a sustainable living enthusiast, or just someone curious about indoor fruit gardening, this comprehensive guide will teach you everything you need to know about growing pineapples in water at home.
Table of Contents
- Introduction to Pineapple Propagation
- What You’ll Need: Materials & Tools
- Selecting the Right Pineapple
- Preparing the Pineapple Crown
- Rooting Pineapple in Water
- Monitoring Growth and Development
- Transitioning from Water to Soil (Optional)
- Common Problems and How to Solve Them
- Frequently Asked Questions
- Conclusion
1. Introduction to Pineapple Propagation
Pineapples are not grown from seeds but are instead propagated from the crown of a mature fruit. The crown is the leafy top of the pineapple, and under the right conditions, it can develop roots and grow into a new plant.
Why Grow Pineapples in Water?
- Low maintenance: No need for complex hydroponics or soil systems to start.
- Fascinating process: Watching roots develop in real-time is a great educational experience.
- Space-saving: Ideal for apartment dwellers or small homes.
- Cost-effective gardening: All you need is one store-bought pineapple to begin.
2. What You’ll Need: Materials & Tools
To get started, you’ll need just a few basic items, many of which you probably already have at home:
Essential Supplies
- A healthy, ripe pineapple with a green, firm crown
- A sharp knife or kitchen shears
- A glass or jar (preferably transparent for monitoring roots)
- Clean, chlorine-free water (filtered water is ideal)
- Toothpicks or bamboo skewers (optional)
- A sunny windowsill or a spot with indirect sunlight
- Paper towel for drying the crown
- Gloves (optional but helpful if you have sensitive skin)
Optional but Helpful Tools
- Liquid rooting hormone (for faster root development)
- Grow light (for homes with limited natural sunlight)
- Humidifier (if you live in a very dry climate)
3. Selecting the Right Pineapple
Choosing the right pineapple is crucial to the success of your propagation.
Characteristics of a Good Pineapple for Propagation:
- Healthy crown: Look for firm, green leaves with no signs of wilting, yellowing, or browning.
- No visible mold at the base of the crown.
- Fully ripe fruit: This ensures the crown is mature enough to grow roots.
- Avoid pineapples with a soft, mushy top or a crown that’s easily pulled out—it may be too old.
Bonus Tip:
Look at the center of the crown—new growth indicates strong potential for propagation.
4. Preparing the Pineapple Crown
This step is where precision and patience matter most. The goal is to remove the crown and prepare it for rooting.
Steps to Remove the Crown:
- Firmly grip the base of the crown and twist it off the fruit. Alternatively, slice off the top 1 inch of the pineapple with a knife.
- Remove any leftover fruit flesh from the base of the crown. This is crucial, as leftover fruit can rot in water and hinder root growth.
- Carefully strip away the bottom 1 inch of leaves to expose the root nodes—these are the small brown nubs where roots will emerge.
Drying the Crown:
Let the crown dry for 1–2 days on a paper towel. This helps to heal the wound and reduces the chance of rot.
⚠️ Do not skip this step. Root rot is the #1 reason pineapple crowns fail to thrive in water.
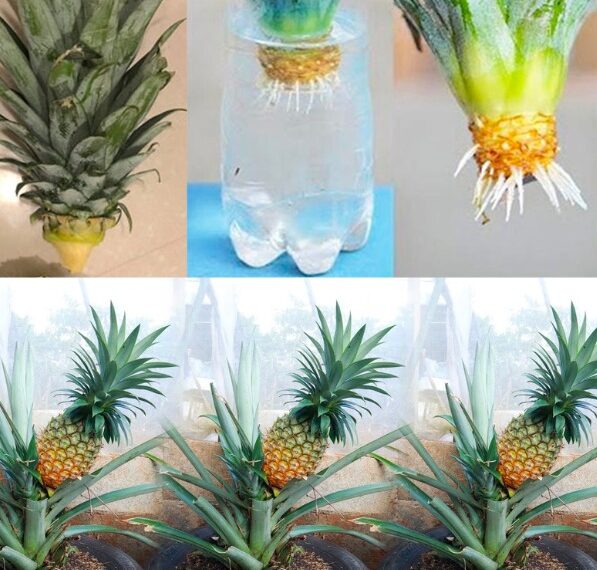
5. Rooting Pineapple in Water
Now comes the fun part—encouraging your pineapple crown to develop roots in a water environment.
How to Set It Up:
- Fill your glass jar or container with clean, room-temperature water.
- Suspend the crown so that only the base (not the leaves) is submerged in the water. You can use toothpicks to hold the crown in place, similar to how you would with an avocado pit.
- Place the jar in a bright spot, ideally near a window with indirect sunlight.
- Change the water every 2–3 days to prevent bacterial buildup.
What to Expect:
- Roots may begin to appear in as little as 1 week, though it usually takes about 2–4 weeks.
- You’ll notice white, thin roots sprouting from the base.
- Eventually, new leaf growth will emerge from the center of the crown—a sign your pineapple is establishing itself.
💡 Tip: Adding a drop of liquid rooting hormone to the water can accelerate the rooting process.
6. Monitoring Growth and Development
As your pineapple develops, keep a close eye on water clarity, root health, and leaf growth.
Key Milestones:
| Timeframe | What to Expect |
|---|---|
| Week 1 | Minimal changes; no visible roots yet |
| Week 2–3 | Tiny roots emerge from the stem |
| Week 4–6 | Root system becomes established |
| Week 6+ | New leaf shoots appear at the center |
Water Maintenance:
- Use filtered water to avoid chlorine and fluoride buildup.
- Avoid overfilling—submerge just the base, not the leaves.
- If you see cloudy water or smell rot, it’s time for a thorough rinse.
7. Transitioning from Water to Soil (Optional but Recommended)
Click page 2 for more