Hydrangeas are among the most beloved flowering shrubs in gardens worldwide. Their lush foliage and spectacular blooms—ranging from soft pastels to vibrant blues and pinks—make them a staple in landscaping and home gardens. If you adore hydrangeas and want to expand your garden without buying new plants, the good news is you can multiply hydrangeas easily at home using several straightforward propagation techniques.
Whether you are a beginner gardener or experienced plant lover, this comprehensive guide will walk you through the best methods to multiply hydrangeas. You’ll discover step-by-step instructions, practical tips, and little-known tricks to grow healthy new plants from cuttings, layering, or division. By the end of this article, you’ll have everything you need to create a thriving hydrangea collection, all from a single parent plant.
Why Multiply Hydrangeas?
Before diving into the “how,” let’s explore why multiplying hydrangeas is worthwhile:
- Cost savings: Instead of buying new plants, propagate from what you already have.
- Preserve your favorite varieties: Exact clones keep the same flower color and form.
- Increase garden coverage: More plants mean more blooms and garden impact.
- Share with friends: Propagated plants make thoughtful gifts.
- Gardening satisfaction: Growing plants from cuttings or divisions is deeply rewarding.
Hydrangeas are not just beautiful—they’re also surprisingly easy to multiply with a little patience and attention.
When Is the Best Time to Multiply Hydrangeas?
Timing matters for successful propagation:
- Late spring to early summer is ideal for softwood cuttings (new growth that’s still flexible).
- Mid to late summer is perfect for semi-hardwood cuttings (partially mature stems).
- Fall or early spring work well for division and layering since the plant is less active.
If you’re new to hydrangea propagation, starting with softwood cuttings in late spring gives the highest success rate.
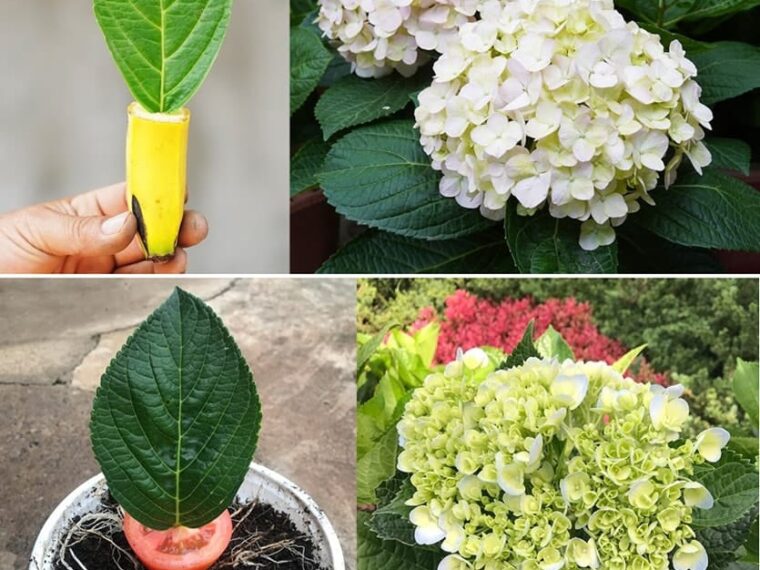
Method 1: Propagating Hydrangeas from Cuttings
This is the most popular and accessible way to multiply hydrangeas. The beauty of cuttings is you get a clone—an exact genetic copy—of the parent plant, ensuring your new blooms look exactly the same.
Step 1: Choose the Right Stem
Look for healthy, non-flowering shoots with soft, green growth. The stem should be about 4-6 inches long and flexible but firm to the touch. Avoid woody or very young shoots.
Step 2: Prepare Your Tools and Materials
- Sharp pruning shears or scissors
- A clean container or pot with well-draining potting soil
- Rooting hormone powder or gel (optional but helpful)
- Clear plastic bag or plastic bottle to create a humidity dome
- Water
Step 3: Take the Cutting
- Cut the stem just below a leaf node (where the leaf joins the stem).
- Remove the lower leaves, leaving 2-3 pairs of leaves at the top.
- If leaves are large, cut them in half to reduce moisture loss.
Step 4: Apply Rooting Hormone (Optional)
Dip the cut end into rooting hormone. This encourages faster root development but is not mandatory.
Step 5: Plant the Cutting
- Insert the cut end about 1-2 inches deep into moist potting soil.
- Firm the soil around the stem to keep it upright and stable.
Step 6: Create a Humid Environment
Cover the pot with a clear plastic bag or use a plastic bottle cut in half as a mini greenhouse. This keeps moisture in and speeds up rooting.
Step 7: Care for the Cutting
- Place in bright, indirect sunlight.
- Keep the soil moist but not soggy.
- Ventilate occasionally to prevent mold.
Step 8: Wait for Roots to Develop
In about 3-4 weeks, gently tug the cutting to feel if roots have formed. Once roots are strong, transplant the new plant to a larger pot or garden bed.
Method 2: Multiplying Hydrangeas by Layering
Layering is a natural way plants multiply in the wild. It involves bending a low branch to the ground and encouraging it to root while still attached to the parent plant.
Step 1: Choose a Low Branch
Find a flexible, healthy branch that reaches the ground easily.
Step 2: Prepare the Site
Loosen the soil beneath the branch and dig a shallow trench about 2-3 inches deep.
Step 3: Wound the Branch (Optional)
To encourage rooting, gently scrape a small section of the branch’s underside to expose the green layer.
Step 4: Bury the Branch
- Bend the branch into the trench.
- Cover the wounded part with soil, leaving the tip exposed.
- Use a stone or pin to keep the branch in place.
Step 5: Water and Wait
- Keep the soil moist around the buried section.
- Roots typically develop in 2-3 months, sometimes longer depending on conditions.
Step 6: Sever and Transplant
Once roots are well established, cut the new plant free from the parent and transplant as desired.
Method 3: Dividing Hydrangeas
Dividing is best for older, well-established hydrangea bushes with multiple stems.
Step 1: Choose the Right Time
Early spring or fall, when the plant is dormant or less active.
Step 2: Prepare the Plant
- Water the plant thoroughly a day before division.
- Dig around the bush carefully, trying to keep roots intact.
Step 3: Divide the Root Ball
- Use a sharp spade or garden fork to split the root ball into smaller sections, each with stems and roots.
- Make clean cuts to minimize damage.
Step 4: Replant Immediately
- Plant divisions in prepared soil, keeping root crowns at the soil surface.
- Water deeply to settle soil and reduce transplant shock.
Tips for Successful Hydrangea Propagation
click page 2 to continue