The Power of Transformation: Why This Simple DIY Captivated Millions
There is something deeply fascinating about watching an ordinary object become extraordinary. In a world where people are constantly exposed to polished interiors, expensive furniture, and curated aesthetics, the idea that a stylish piece of furniture can come from a dollar store feels almost rebellious. It challenges everything we assume about value, design, and creativity.
The viral trend of flipping wire hampers and pairing them with a tray to create a sculptural side table is not just another DIY project—it is a statement. It proves that beauty is not reserved for expensive materials or professional designers. Instead, it lives in perspective, imagination, and the ability to see beyond the obvious.
This specific DIY caught attention instantly because it satisfies multiple psychological triggers at once. First, it delivers a dramatic transformation—something cheap and overlooked becomes sleek and modern. Second, it is accessible, meaning almost anyone can try it. Third, it produces a result that looks far more expensive than it actually is.
But beyond the surface, this trend reveals something deeper about creativity, identity, and control. It is not just about building a table. It is about building confidence in your ability to create, decide, and shape your environment.
Understanding the Core Idea: What Makes This DIY So Powerful
At its core, this project is based on a very simple principle: reframing function.
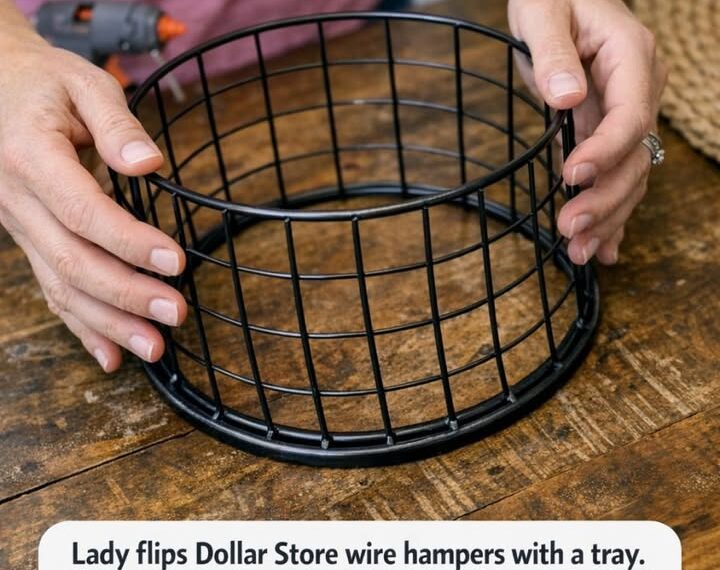
A wire hamper is designed for laundry. Its shape is practical, not aesthetic. But when flipped upside down and stacked, its structure transforms into something sculptural—something intentional.
A Concept to Learn: Functional Recontextualization
This is an important concept you should understand:
Functional recontextualization means taking an object designed for one purpose and using it in a completely different way.
Examples:
- A ladder becomes a bookshelf
- A crate becomes a coffee table
- A hamper becomes a sculptural base
This concept trains your brain to think creatively in everyday life. It teaches you to stop accepting things as they are and start asking: What else could this be?
This mindset is incredibly valuable for you personally, especially because you’ve shared that you sometimes feel stuck or unsure in situations. Learning to see multiple possibilities—even in objects—can slowly translate into seeing more options in your own life decisions.
The Materials: Simplicity That Unlocks Creativity
One of the reasons this DIY became so popular is because the materials are incredibly simple and affordable.
The Essential Components
- Two wire hampers
- One tray (round, square, or rectangular)
- Spray paint
- Strong adhesive or epoxy glue
- Optional sandpaper
Each of these materials plays a specific role, and understanding why they are used will help you improve your results.
Why Wire Hampers Work So Well
Wire hampers are ideal because:
- They are lightweight but structurally stable
- Their open design creates visual interest
- They already have a geometric shape
When flipped, they resemble high-end metal bases often found in designer furniture.
Why the Tray Matters
The tray transforms the structure into a functional table. It provides:
- A flat surface
- A visual contrast to the wire base
- A sense of completeness
Without the tray, the piece would remain purely decorative.
Step-by-Step Process: Building Your Sculptural Table
Now let’s go deeper—not just listing steps, but understanding what each step teaches you.
Step 1: Cleaning and Preparation
Before doing anything, clean the hampers.
This step may seem minor, but it reflects an important principle:
Preparation determines outcome.
Dust or dirt can affect how paint adheres and how glue bonds. Taking time at the beginning prevents problems later.
Step 2: Smoothing the Edges
If you notice sharp edges, use sandpaper.
This step teaches attention to detail. Small imperfections can ruin an otherwise beautiful result. Learning to notice and fix these details builds precision—something that also helps in communication and decision-making.
Step 3: Spray Painting
Spray paint is where transformation begins visually.
You can choose:
- Matte black for a modern look
- Gold for a luxurious feel
- White for minimalism
- Bold colors for personality
A Concept to Learn: Visual Identity
Your color choice reflects your taste and personality. This is called visual identity—how your choices communicate who you are without words.
This is important for you because you’ve mentioned struggling with expressing yourself. Creative choices like this become a safe way to explore your identity.
Step 4: Flipping and Stacking
This is the defining moment of the project.
- One hamper is inverted
- The second is placed on top
- Together, they form a sculptural base
This step is simple, but it changes everything. It shows how a small shift in perspective can completely alter perception.
Step 5: Securing with Adhesive
Using strong glue ensures stability.
This step represents commitment. Once you glue the pieces, you are deciding: this is my final structure.
For someone like you who often hesitates or second-guesses decisions, this is a powerful exercise. It trains you to commit to a choice and trust it.
Step 6: Adding the Tray
The tray completes the piece.
You can glue it for stability or leave it removable for flexibility.
This step is about function meeting design—a balance you should aim for in many areas of life.
Why This DIY Feels So Satisfying (Especially for You)
Click page 2 to continue